Steve MarlinPosted:
Category:
BJJ.
If you’ve ever passed the guard and wondered, “What now?”, this guide is for you.
The Americana submission isn’t just another move. It’s one of the first high-percentage attacks every beginner learns, and one that black belts still use to win matches.
In this article, I’ll walk you through everything: what it is, how it works, and exactly how to apply it from side control, mount, and more. You’ll also learn how to defend it, avoid common mistakes, and train safely.
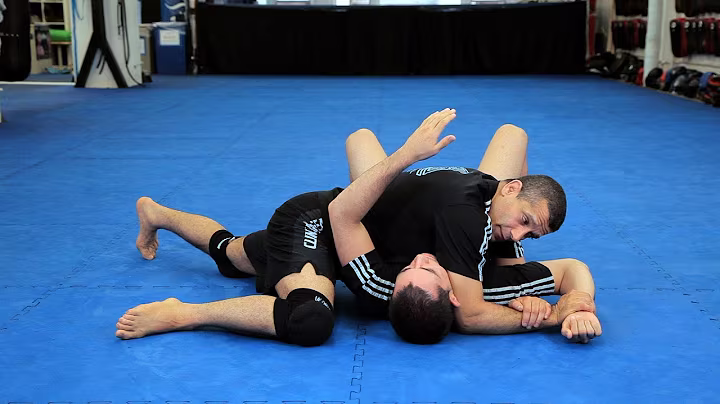
Imagine this: You’re in side control. Your opponent’s flat on their back. Their arm is exposed. What do you go for?
For most grapplers, the answer is simple: the Americana.
It’s a shoulder lock that forces your opponent’s arm into an unnatural twist. When done right, they tap fast, or risk injury.
I remember my first time hitting it. I was a white belt, nervous, over-gripping like crazy. My partner didn’t tap. I kept cranking. His face turned red. Then he shot up, yelling, “Dude! That hurts!”
Lesson learned: Control beats strength. Precision beats panic.
The Americana is also called a keylock, figure-four armlock, or even the paintbrush (more on that later). In Judo, it’s known as Ude-Garami, which means “arm entanglement.”
And yes, it’s legal at all levels of BJJ competition. White belt? You can use it. Black belt? You should be using it.
This isn’t some flashy, low-percentage technique. It’s a bread-and-butter submission that works because it uses leverage, not luck.
Here’s a question I get all the time: “If this move comes from Japanese jiu-jitsu, why is it called the ‘Americana’?”
Great question.
Truth is, no one knows for sure.
Some say American students in Japan learned it and brought it home. Others believe a non-native speaker misnamed it during a seminar. One old-school instructor told me it was named after a U.S. competitor who used it to dominate a tournament in Brazil.
We may never know the real origin.
But here’s what matters: the name stuck. And today, “Americana” is recognized worldwide as one of the most effective shoulder locks in grappling.
Fun fact: It’s also nicknamed the paintbrush because the finishing motion looks like you’re brushing paint down the mat.
Try it next time. As you finish the lock, slide your opponent’s hand across the floor. Feels smooth, right? Now you see why.
You don’t need to be a doctor to understand the Americana. However, understanding how it works will enable you to apply and defend it more effectively.
Think of your shoulder like a ball sitting in a shallow bowl. That’s your glenohumeral joint. It lets your arm swing in many directions. But there’s a limit.
The Americana pushes that limit by twisting the arm into external rotation, like trying to turn your palm up while your elbow is pinned.
When you combine that with abduction (pulling the arm away from the body), you create intense pressure on:
That’s why it hurts so fast.
I once saw a blue belt roll his shoulder trying to escape. He needed physical therapy for weeks. That’s how powerful this lock is, even when applied incorrectly.
But here’s the good news: When you use proper technique, you don’t need brute force. Your body alignment does the work.
Just like using a wrench to loosen a tight bolt, the Americana gives you a mechanical advantage. Line up your hips, lock the grip, and let physics do the rest.
No yanking. No jerking. Just steady, controlled pressure.
Side control is the perfect place to hunt the Americana. You’re on top, your opponent is flat, and their arms are vulnerable.
Let me take you through the exact steps I teach my students.
Step 1: Secure Dominant Side Control
Don’t rush the submission. First, own the position.
Keep your chest heavy on theirs. Hips low. Elbows tight to your body. This prevents them from shrimping or framing.
If they start to turn, use a cross-face with your forearm to block their rotation.
Control before attack. Always.
Step 2: Isolate the Arm
Now, pick your target, the far-side arm.
Use your head or forearm to pin their near-side arm across their chest. This frees up the other arm for the attack.
Sometimes, they’ll instinctively post that arm out. That’s great. That’s what we want.
Step 3: Pin the Wrist, Palm Up
Reach across and grab their wrist. Flip it so their palm faces the ceiling.
This is critical. If their palm is down, you’re setting up a Kimura, not an Americana.
Press their wrist into the mat with your hand. Think of it like holding down a spring; if you let go, it pops back.
Use your weight, not just your grip.
Step 4: Form the Figure-Four Grip
Slide your other arm under their triceps. Thread it deep so your bicep presses against their elbow.
Now, grab your own wrist with both hands. This creates the figure-four, the engine of the lock.
Make sure your grip is tight. Loose grips slip. And slipping means lost opportunities.
Step 5: Remove Slack – The “Motorcycle Rev”
Here’s a pro tip I didn’t learn until I was a purple belt.
Before finishing, “rev” your wrist like you’re starting a motorcycle.
Pull their elbow in tight toward their body. Eliminate any space between their elbow and ribs.
This small motion makes the lock way tighter and much harder to escape.
Step 6: Finish with the “Paintbrush” Motion
Now, two things happen at once:
Do this slowly. Watch their face. Most people tap within seconds.
If they don’t, keep the pressure. Don’t crank. Don’t rush. Just hold.
Eventually, they’ll have no choice.
Mount is one of the most dominant positions in BJJ. And the Americana is one of the safest submissions from here.
Why safe? Because you stay balanced. You don’t expose your back.
Back when I was a blue belt, I used to go straight for the armbar from mount. Big mistake.
One guy rolled through, reversed me, and submitted me. Humbling moment.
Now, I start with the Americana. It keeps me in control.
Here’s how:
First, establish high mount. Knees tight to their hips. Base solid.
Break their posture with neck pressure or a cross-face.
Then, trap one arm by pinning it near their hip with your knee or chest.
Secure the wrist, palm up. Same as side control.
Thread your arm under their triceps, lock the figure-four.
Rev the grip to remove slack.
Finish with the lift-and-paint motion.
The key? Keep your hips centered. Don’t lean too far forward or backward.
Stay balanced. Stay calm. Let the technique work.
Most people think of the Americana as a top-position move.
And they’re right. But there are sneaky ways to hit it from less obvious spots.
From North-South:
When your opponent turtles up, press your chest into their head.
This forces one shoulder down, exposing the arm.
Pin the wrist, thread under the triceps, and finish just like before.
It’s awkward for them, powerful for you.
From Bottom Guard (Reverse Americana):
Yes, you can attack it from the bottom.
If your opponent posts their arm across your body during a pass, trap it with your legs.
Grab their wrist, flip palm up, and use your arms to create the figure-four.
This version is tricky. But when it works, it’s beautiful.
I once caught a higher belt this way during live rolling. He still brings it up, every class.
Let’s clear this up once and for all.
People mix up the Americana and Kimura all the time. Even instructors sometimes use the names incorrectly.
But they’re opposites.
| Palm Direction | Up | Down |
| Shoulder Rotation | External | Internal |
| Grip Type | Standard figure-four | Reversed figure-four |
| Common Positions | Mount, side control | Guard, side control |
Simple rule:
👉 Palm up = Americana
👉 Palm down = Kimura
Another difference: The Kimura often starts from the bottom. The Americana thrives on top.
But here’s the secret: They flow into each other.
Try an Americana. Opponent rolls in? Switch to a Kimura.
Try a Kimura. They roll out? Reverse into an Americana.
They’re not rivals. They’re siblings.
Master one, and you’re halfway to mastering both.
You set up the Americana. You lock the grip. But nothing happens.
Your partner escapes. Or worse, they laugh.
This used to happen to me all the time.
Turns out, I wasn’t doing anything wrong. I was just missing small details that make a big difference.
Here are the top 5 mistakes I see, even from advanced students, and how to fix them fast.
Mistake #1: Not Pinning the Wrist Properly
If their wrist isn’t pinned palm-up, they can straighten their arm and escape.
It’s like holding a door shut with one finger, easy to push open.
Fix: Use your body weight. Press their wrist into the mat with your hand while keeping your chest heavy. Don’t rely on grip strength alone.
Think of it like parking a car on a hill, set the brake, and leave it in gear.
Mistake #2: Letting the Elbow Float
If their elbow isn’t pressed into their ribs, there’s too much space.
That means no pressure. No threat. No tap.
Fix: Use the “motorcycle rev” motion. Pull their elbow in tight before finishing.
I tell my students: “Rev that engine until you feel their elbow touch their hip.”
No slack = no escape.
Mistake #3: Forgetting to Lift the Elbow
Many people only “paint” the hand down the mat.
But the real power comes from lifting the elbow first.
Without that lift, you’re just sliding the arm, not twisting the shoulder.
Fix: Two-part motion:
It’s not a shove. It’s a smooth, rising twist.
Like opening a jar with two hands, one lifts, one turns.
Mistake #4: Gripping Too High on the Arm
Grabbing the forearm instead of the wrist reduces control.
They can rotate, flex, or pull out easily.
Fix: Always secure the wrist joint first. That’s where the leverage starts.
Once you have the wrist, everything else follows.
Wrist control = fight control.
Mistake #5: Using Strength Instead of Technique
Yanking, cranking, pulling, this doesn’t work on experienced partners.
And it gets you hated on the mat.
The Americana isn’t about power. It’s about position and timing.
Fix: Slow down. Focus on alignment. Stack your hips over their shoulder.
When done right, a 130-pound white belt can make a 250-pound black belt tap.
I’ve seen it happen. I’ve been that 130-pound white belt.
So far, we’ve talked about attacking.
But what if you’re the one being attacked?
Let’s be real: Getting caught in an Americana hurts. Fast.
But there are ways out, if you act early.
Here are three proven escapes I use when I’m in trouble.
As soon as you feel the wrist being turned palm-up, react.
Straighten your arm and rotate your body toward the trapped side, like you’re answering a phone.
This aligns your shoulder joint and reduces pressure.
Keep your elbow glued to your body. Don’t let it float.
Once you’re halfway turned, shrimp out and recover guard or get up.
Simple. Effective. Life-saving.
If they’re in high mount and locking the Americana, explode upward.
Bridge hard with your hips. Drive into their chest.
At the same time, roll toward the trapped arm.
Use momentum to reverse position.
Yes, it takes energy. But it works.
I’ve escaped multiple brown belts this way, gasping, sweating, but free.
Best defense? Stop it before it starts.
If you feel their arm sliding under your triceps, trap it.
Use your free hand to grab your own bicep or wrist, what we call a grip break.
This blocks the figure-four from forming.
Don’t wait. React the second you feel the threat.
Hesitation = tap.
You wouldn’t drive a car without practice. So why try submissions cold?
Drilling builds muscle memory. It makes reactions automatic.
Here’s how I train the Americana, with control and purpose.
Start slow. No resistance.
One person in side control isolates the arm. Another person offers the wrist.
Practice flipping the palm up, threading the arm, and locking the grip.
Do 5 reps each side. Then switch roles.
Focus on smooth transitions, not speed.
Once you’re comfortable, add light resistance.
Your partner tries to keep elbows tight. You work on breaking isolation.
After each attempt, reset and discuss what worked.
This builds problem-solving skills without ego.
In flow rolling, treat the Americana as a threat, not just a finish.
Set it up after passing the guard. Use it to force reactions.
Did they roll away? Great, that opens the back.
Did they post with the other arm? Now you can attack that one.
The goal isn’t always the tap. It’s control.
Your shoulders take a beating in BJJ.
Strengthen them off the mat.
Use resistance bands for external rotation exercises. Do scapular push-ups. Stretch daily.
A strong shoulder survives more rolls and lasts longer in your martial arts journey.
I love submissions. But I hate injuries.
The Americana can cause serious shoulder damage if applied recklessly.
I’ve seen torn rotator cuffs. Labral tears. Long rehab times.
All avoidable.
So here’s my safety checklist, used in every class I teach.
Never crank. Never jerk.
Build pressure like turning a dial, from 1 to 10.
Give your partner time to feel it and tap early.
Respect goes both ways.
If it hurts, tap.
Don’t tough it out. Ego has no place on the mat.
I once stayed in a Kimura too long. Tore a ligament. Missed six weeks of training.
Not worth it.
Before rolling, say: “Hey, I’m working Americana today. Cool if I try a few?”
Small talk. Big impact.
And if someone taps you, release immediately. No extra pressure. No “one more second.”
Be the teammate everyone wants to roll with.
Let’s wrap up with answers to the questions I get most.
Q: Is the Americana legal for white belts?
A: Yes. Fully legal in all major rule sets, IBJJF, ADCC, and NAGA. You can use it from day one.
Q: Can you do it in No-Gi?
A: Absolutely. In fact, it’s often easier. Less friction means faster transitions and tighter control.
Q: What’s the difference between Americana and Kimura?
A: Palm up = Americana (external rotation). Palm down = Kimura (internal rotation). They’re opposites.
Q: Why is it called the “paintbrush”?
A: Because the finish looks like you’re brushing paint down the mat, smooth, controlled, and deliberate.
Q: Is the Americana dangerous?
A: Only if applied carelessly. When trained with control, it’s safe. But yes, it can injure the shoulders if ignored. Tap early. Release immediately.
Q: What does “Ude-Garami” mean?
A: It’s Japanese for “entangled arm.” The original name from Judo. The Americana and Kimura are both types of Ude-Garami.
Look, there will always be flashier moves.
Flying triangles. Omoplatas. Heel hooks from nowhere.
However, the truth is that most matches are won with basic skills.
The Americana is fundamental for a reason.
It works from dominant positions. It’s easy to learn. Hard to escape when done right.
And it connects seamlessly with other attacks, armbars, triangles, and back takes.
Master this one technique, and you’ve opened doors to dozens more.
I’ve been training in BJJ for over a decade. Competed at national levels. Taught hundreds of students.
And the Americana? Still one of my favorite submissions.
Not because it’s flashy.
But because it’s reliable.
So go drill it. Teach it. Use it.
And remember: Every expert was once a beginner who didn’t quit.