Steve MarlinUpdated:
Category:
BJJ.
I’ve tapped from arm triangles, and yes, I’ve also tapped others with them (usually after they underestimated me).
This move? It’s not flashy. It doesn’t require insane flexibility or brute strength. But when done right, it shuts lights off fast.
In this guide, we’ll break down everything about the arm triangle choke, from what it is, to how to hit it, defend it, and even chain it into other attacks.
Whether you’re new to BJJ or sharpening your MMA game, this is your roadmap to mastering one of the most reliable submissions in grappling.
Let’s get started.
Remember that moment in UFC when Demian Maia locked in a tight arm triangle and put his opponent to sleep?
No wild swings. No luck. Just control, pressure, and precision.
That’s the power of the arm triangle choke.
It’s not about being the strongest guy in the room. It’s about being the smartest.
And here’s why it matters:
I once used it to finish a much bigger blue belt during a tournament. He was strong, but he left his head exposed for half a second.
That’s all it takes.
If you learn nothing else today, know this: The arm triangle isn’t just a submission; it’s proof that technique beats size.
So, what exactly is an arm triangle choke?
Simple: It’s a blood choke that cuts off blood flow to the brain by squeezing the carotid arteries on one side of the neck.
But here’s the twist: you use your opponent’s own arm as part of the weapon.
Think of it like closing a pair of scissors. Your bicep and shoulder form one blade. Their arm and neck form the other.
Together, they create a vise.
Now, some people confuse it with crushing the windpipe. That’s wrong.
You’re not trying to make them gasp for air.
You’re making their brain say, “Hey, I need oxygen. Time to tap, or nap.”
And trust me, when that pressure hits, taps come quick.
Let’s clear up the biggest mix-up in BJJ.
Is the arm triangle the same as the triangle choke?
Nope.
They sound alike. But they work completely differently.
The arm triangle uses your arms and head. You’re on top, usually in mount or side control.
The leg triangle (what most call just “triangle”) uses your legs. You’re on your back, wrapping your thighs around their neck and arm.
One comes from the top. One comes from the bottom.
One uses arms. One uses legs.
Same goal (cut blood flow), different tools.
Another common confusion: D’Arce vs. arm triangle.
Both trap the head and one arm.
But the D’Arce wraps under the armpit with the choking arm inside the body.
The arm triangle keeps your choking arm outside, pressing directly with the bicep.
D’Arce feels like a sideways seatbelt.
Arm triangle feels like a hydraulic press.
Anaconda? That’s a spiral squeeze from the front headlock position.
You wrap under and over, then roll through.
It looks dramatic. But it’s riskier.
The arm triangle? Safer, more stable, and easier to finish from dominant control.
Bottom line: Know the difference. Each has its place. But the arm triangle is the bread and butter.
You might think the arm triangle is a modern BJJ invention.
But it’s older than your grandpa’s judo manual.
Its roots go back to catch wrestling and early judo, where strangles were used to subdue opponents without strikes.
When the Gracies brought jiu-jitsu to Brazil, they refined these techniques.
They realized: Control beats chaos.
So they taught students to dominate position first, then apply chokes like the arm triangle.
Fast forward to today.
In MMA, fighters like Nate Diaz and Charles Oliveira have made it famous.
In BJJ, Gordon Ryan uses it like a switchblade, quick, silent, effective.
Even in self-defense, law enforcement and military units train variations of this choke.
Because when you need someone stopped, fast and safely, this is one of the best tools available.
Still not convinced?
Here’s why every grappler should add this to their arsenal.
First: It works for everyone.
Big or small. Strong or technical. Male or female.
I’ve seen 130-pound women put 200-pound men to sleep with perfect form.
Second: It’s energy-efficient.
Unlike scrambles or explosive submissions, the arm triangle rewards patience.
You don’t sprint. You squeeze.
Third: It fits into transitions.
Miss a takedown? Land in side control? Boom, setup begins.
Try to pass guard and end up in mount? Even better.
And fourth: It builds confidence.
Knowing you can finish from top control changes how you roll.
You stop fearing sweeps. You start hunting finishes.
Want proof?
Look at the stats.
In high-level BJJ, the arm triangle has one of the highest completion rates among upper-body chokes.
Not because it’s flashy.
Because it’s simple, effective, and hard to escape once fully locked.
Now let’s talk setup.
Where do you launch this thing?
Spoiler: From the top.
But not just any top position.
Let’s break it down.
Mount is king for arm triangles.
You’re sitting on their chest. They can’t breathe easy. And if they turn, you follow.
To set it up:
Pro tip: Keep your hips low. Don’t bounce. Pressure wins, not speed.
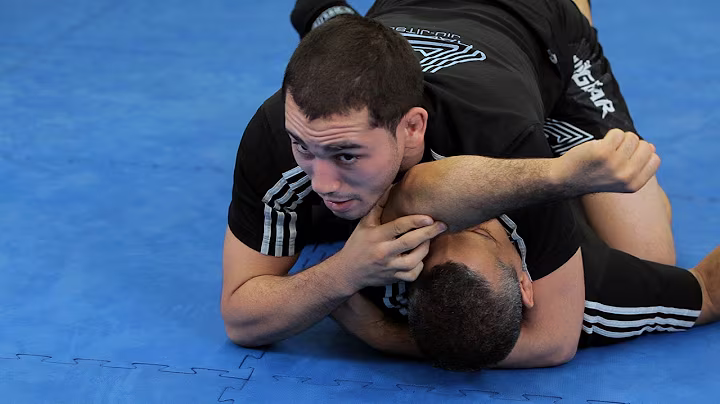
Side control is where most arm triangles begin.
You’re already heavy. Now go heavier.
Trap their arm with your forearm.
Drop your head under their armpit.
Align your bicep with their neck.
Squeeze your elbows together like you’re holding a beach ball.
I once finished a sparring session this way; my partner didn’t even see it coming.
That’s the beauty of side control. It hides the threat until it’s too late.
This one catches people off guard.
You’re face-to-face, driving pressure down.
If they turn their head, you slide your arm over and thread your head in.
It’s like a ninja move, but legal.
Great for breaking stubborn defenses.
Can you hit it from the bottom?
Yes, but not how you’d expect.
Usually happens during a reversal.
You sweep, end up in side control mid-transition, and lock it before they settle.
Or in inverted positions, like deep half or butterfly.
These are advanced. We’ll cover them later.
In MMA, fighters fake takedowns, sprawl, and catch the arm triangle mid-scramble.
Or from a front headlock against the cage.
It’s high-risk, but when it lands? Fight over.
Ask any UFC fan.
Alright. Let’s get into the nitty-gritty.
Here’s how to do it, step by step.
Step 1: Secure Dominant Position
No point trying the choke if you’re getting swept.
Be solid in mount or side control.
Chest down. Hips heavy. Control their movement.
Step 2: Isolate the Arm and Head
Use your forearm to pin their near-side arm across their neck.
Don’t let them pull it out.
Their head and arm should be trapped together.
Step 3: Thread Your Head Under the Armpit
Tuck your chin and slide your head under their armpit.
Your bicep should press against the side of their neck.
Keep your head snug, like you’re hugging their shoulder.
Step 4: Form the Figure-Four Grip
Clasp your hands together.
Options:
Pick what fits your body type.
Step 5: Apply Pressure
Now the fun part.
Squeeze your elbows together.
Drive your shoulder into their neck.
Push your hips forward, like you’re doing a hip escape toward them.
Feel the pressure build?
Good.
Hold it.
You’ve learned the basics. Now let’s add some spice.
The arm triangle isn’t just one move, it’s a family of attacks. And smart grapplers use them all.
This one starts from the bottom, often in deep half guard or inverted positions.
You’re on your back, legs tangled, but you see an opening.
As they put their arm across your chest, you trap it.
Then, instead of pushing up, you roll into them.
Your head goes under their armpit, bicep to neck, and boom, you reverse the pressure.
I first saw this at a tournament. A tiny guy reversed a big dude and put him out cold.
No one saw it coming.
It’s high-risk, but when it lands? Pure magic.
Flying Arm Triangle – For the Brave (or Reckless)
Want to go viral?
Try the flying arm triangle.
From standing, you jump, wrap your arms around their head and one arm, and twist mid-air into the choke.
Sounds wild? It is.
But fighters like Gordon Ryan have used it in live matches, with success.
Best used as a surprise after a failed takedown or during scrambles.
Just don’t try it on your first day. Gravity always wins eventually.
In gi BJJ, you can enhance control with the belt or lapel.
Before threading your head, grab their far-side collar.
Pull it tight. This breaks their posture and stops them from turning.
Or use your own lapel to wrap around their neck for extra compression.
It’s like adding a seatbelt to your choke.
Simple. Legal. Effective.
Here’s a pro secret: Great submissions come from failed submissions.
If they defend the arm triangle by stacking or turning, don’t panic.
Switch to an armbar or kimura.
Their arm is already isolated. Just pivot your hips and extend.
Or fake the choke to open up a sweep.
This is where real grappling IQ shines.
Even black belts mess this up.
But most errors happen early and are easy to fix.
Let’s troubleshoot.
Mistake #1: Loose Figure-Four Grip
If your hands keep slipping, you’re not squeezing right.
Don’t just clasp and pull.
Pinch your elbows together like you’re holding a watermelon between them.
The power comes from shoulder and hip pressure, not arm strength.
Fix: Practice gripping slowly. Make sure your bicep stays glued to their neck.
Mistake #2: Chin Up, Not Tucked
I see this all the time.
Head high, looking around like they’re checking for traffic.
Big mistake.
Your chin must be tucked to your chest.
Otherwise, there’s space. They escape. You lose.
Fix: Pretend you’re trying to kiss your own shoulder. That’ll get your head in the right spot.
Mistake #3: Static Hips
Some people lock in the choke… and freeze.
They forget: Hips are part of the squeeze.
If you don’t drive them forward, you’re leaving 50% of the pressure behind.
Fix: Treat it like a shrimp, push your hips toward your partner while maintaining base.
Mistake #4: Rushing the Finish
Excitement kills technique.
I’ve rushed it. I’ve failed.
When you yank too hard, you telegraph the move.
They brace. They stack. They survive.
Fix: Build pressure slowly. Let them think they’re safe, then crush.
Like a python. Not a punch.
Mistake #5: Ignoring Base
Ever tried the arm triangle only to get swept halfway through?
Yeah. That hurts.
If you don’t post a hand or widen your base, you’re vulnerable.
Fix: Keep one hand on the mat. Or frame against their hip.
Stay balanced. Stay dangerous.
Now, let’s switch sides.
What if you’re the one getting choked?
Don’t panic. You can escape.
But timing is everything.
Act fast, within the first few seconds.
Best defense? Never let it happen.
Keep your head free.
Don’t let your arm get trapped across your neck.
Use your free hand to frame under their bicep.
Think of it like holding up a collapsing roof.
One solid frame can buy you time to shrimp or roll.
They’ve got your arm pinned. The head is starting to slide under.
Do this:
Turning into them reduces the angle of pressure.
Once you’re chest-to-chest, you can recover guard or stand.
This one’s tough, but doable.
Bridge hard, like you’re doing a sit-up.
Protect your neck with your forearm.
Push their head down if possible.
Roll to your knees and create space.
Yes, it takes strength. But it works.
I escaped Maia-level pressure once using this. Took three tries. But I tapped him later.
Worth it.
In MMA, fighters often get caught while defending takedowns.
Solution? Stack and roll.
Drive your weight forward, push their head down, and roll through to top position.
It’s aggressive. It flips the script.
Used it myself during a no-gi match. Ended up in their guard, and submitted them with a triangle.
Poetic justice.
Knowledge is power. Reps build mastery.
Here are drills I use, and recommend to my students.
No partner? No problem.
Stand in front of a mirror.
Practice threading your head under an imaginary opponent’s armpit.
Form the grip. Squeeze elbows. Drive hips.
Feel the motion.
Do it slow. Then faster.
Build muscle memory.
I do this before every class. Takes five minutes. Huge difference.
Start in side control or mount, every round.
Goal: Hit the arm triangle without getting swept.
Rotate partners. Increase resistance gradually.
Focus on smooth transitions, not speed.
After 10 rounds, you’ll feel it in your bones.
And your game will rise.
During light rolling, agree to focus on arm triangles.
One tries to set it up. One defends, but gives feedback.
“No, you left space.”
“Yes, that pressure was nasty.”
Real-time learning beats theory every time.
Progression Ladder: From White to Black Belt
Mastery isn’t a moment. It’s a journey.
Let me share what the best in the world do differently.
Tip 1: Shoulder Pressure > Arm Strength
Your bicep matters. But your shoulder blade does more.
Drive your shoulder into their neck like a bulldozer.
Less strain. More squeeze.
Tip 2: Adjust for Size
Short opponent? Tuck your head deeper.
Tall opponent? Lift your head slightly to maintain angle.
One small shift = instant improvement.
Tip 3: Breathe Through the Squeeze
Don’t hold your breath and tense up.
Breathe steady. Stay calm.
The choke works better when you’re relaxed.
Tip 4: Use Feints
Pretend to pass. Then drop back into the choke.
Fake an armbar. When they defend, switch.
Keep them guessing.
Tip 5: Stay Composed During Defense
They’re fighting hard. Good.
But don’t panic.
Maintain pressure. Wait.
Most taps happen in the last two seconds.
Like a sniper. Patient. Precise.
I love finishing rolls.
But never at the cost of a training partner.
The arm triangle can be dangerous if misused.
Here’s how to train safely:
Remember: We train to get better, not hurt each other.
Respect the art. Respect your partner.
Let’s answer the big ones.
Q: Is the arm triangle choke legal in BJJ?
A: Yes. Fully allowed in IBJJF, ADCC, NAGA, and all major rulesets.
Q: Can smaller people use it effectively?
A: Absolutely. Leverage > strength. I’ve seen 130-pound women finish 200-pound men.
Q: How long does it take to learn?
A: With practice, 2–4 weeks to perform correctly. Mastery takes months of drilling.
Q: What’s the difference between arm triangle and americana?
A: Arm triangle = neck choke (blood). Americana = shoulder lock (joint).
Q: Can you do it from the bottom?
A: Rarely. Usually happens during sweeps or inversions. Advanced, but possible.
Q: Does it work in self-defense?
A: Yes. Silent, fast, and non-damaging if released quickly. Taught in military programs.
Look, not every roll ends in a tap.
But every roll is a chance to get better.
The arm triangle choke isn’t about ego.
It’s about control. Patience. Precision.
It rewards those who study, drill, and stay calm under pressure.
Whether you’re a white belt nervous on the mat or a seasoned fighter chasing gold,
This move belongs in your toolbox.
So next time you’re in side control…
Don’t just hold position.
Threaten the choke.
Make them fear the squeeze.
And when the tap comes?
Smile.
Because you earned it.