Steve MarlinUpdated:
Category:
BJJ.
If you’ve ever tapped from an armbar or tried and failed to finish one, you’re not alone. I once got caught by a tiny blue belt who barely weighed half of me. All she did? Controlled my wrist, lifted her hips, and snap, I was tapping before I even realized what happened.
That’s the power of the armbar BJJ. It doesn’t care how strong you are. It only cares if you know how to use leverage.
In this guide, we’ll break down everything, from the science behind the lock to advanced chains used by pros. Whether you’re a white belt wondering, “Wait, which way do I swing my leg?” or a seasoned grappler looking to sharpen your game, this is your roadmap to mastering one of BJJ’s most iconic submissions.
Let’s get into it.
So, what makes the armbar so effective?
Imagine trying to bend a pencil at both ends until it snaps. That’s basically what an armbar does to your elbow, but without breaking anything (if done safely).
It’s not about strength. It’s about leverage, control, and timing.
When you hit a clean armbar, you’re using your hips as a fulcrum, like the center point of a seesaw, and pulling down on the arm while pushing up with your body. This hyperextends the elbow joint beyond its natural range.
And guess what? A 100-pound person can make a 250-pound opponent tap just as fast as the other way around,if they know how to apply pressure correctly.
I learned this the hard way during my first tournament. I tried muscling through a mount escape, ignored the warning signs, and boom, I felt that sharp twist in my elbow. Tap. Lesson learned: technique beats brute force every time.
Most submissions fall into two categories: chokes and joint locks.
The armbar is a joint lock, specifically targeting the elbow.
Inside your arm, three bones meet: the humerus (upper arm), and the radius and ulna (forearm). The elbow allows bending and straightening,but not twisting or overextending.
That’s exactly what the armbar exploits.
By locking the arm in place and extending it past its limit, you create intense pressure. The opponent has two choices: tap or risk injury.
This is why referees jump in fast during competitions. Even high-level athletes respect this submission.
And here’s the best part: unlike chokes, which require precise neck alignment, the armbar gives you a little more room for error, as long as your hips are high and your control is tight.
You might ask: “There are dozens of submissions. Why focus on the armbar?”
Simple: availability.
You can attempt an armbar from guard, mount, side control, back control, or even standing.
It shows up after sweeps, counters, scrambles, and failed passes.
Think of it like a Swiss Army knife in your BJJ toolkit. Not always the flashiest tool, but always useful.
I remember drilling armbars one night with my coach. He said, “Steve, if you only learn five submissions in BJJ, make sure one of them is the armbar.”
He wasn’t joking. In IBJJF matches, armbars rank among the top three most-used submissions, right behind the triangle choke and rear-naked choke.
Its versatility makes it a staple at every belt level.
To make the armbar work, four things must align:
Misalign any one piece, and the whole system fails.
For example, if your hips are too low, there’s no pressure. If your hamstring isn’t pressed against their neck, they’ll stack you. If you let go of the wrist, they’ll rotate out and escape.
It’s like building a house. Strong foundation? Great. But forget the roof, and rain gets in.
The same principle applies here.
Now that you understand why the armbar works, let’s move to how to execute it from real positions.
Time to roll up your sleeves, literally.
We’ll walk through the exact steps to pull off the armbar from the most common starting points: closed guard, mount, side control, back control, and even mid-air (yes, really).
These aren’t theoretical moves. These are techniques I’ve used and have had used on me, countless times.
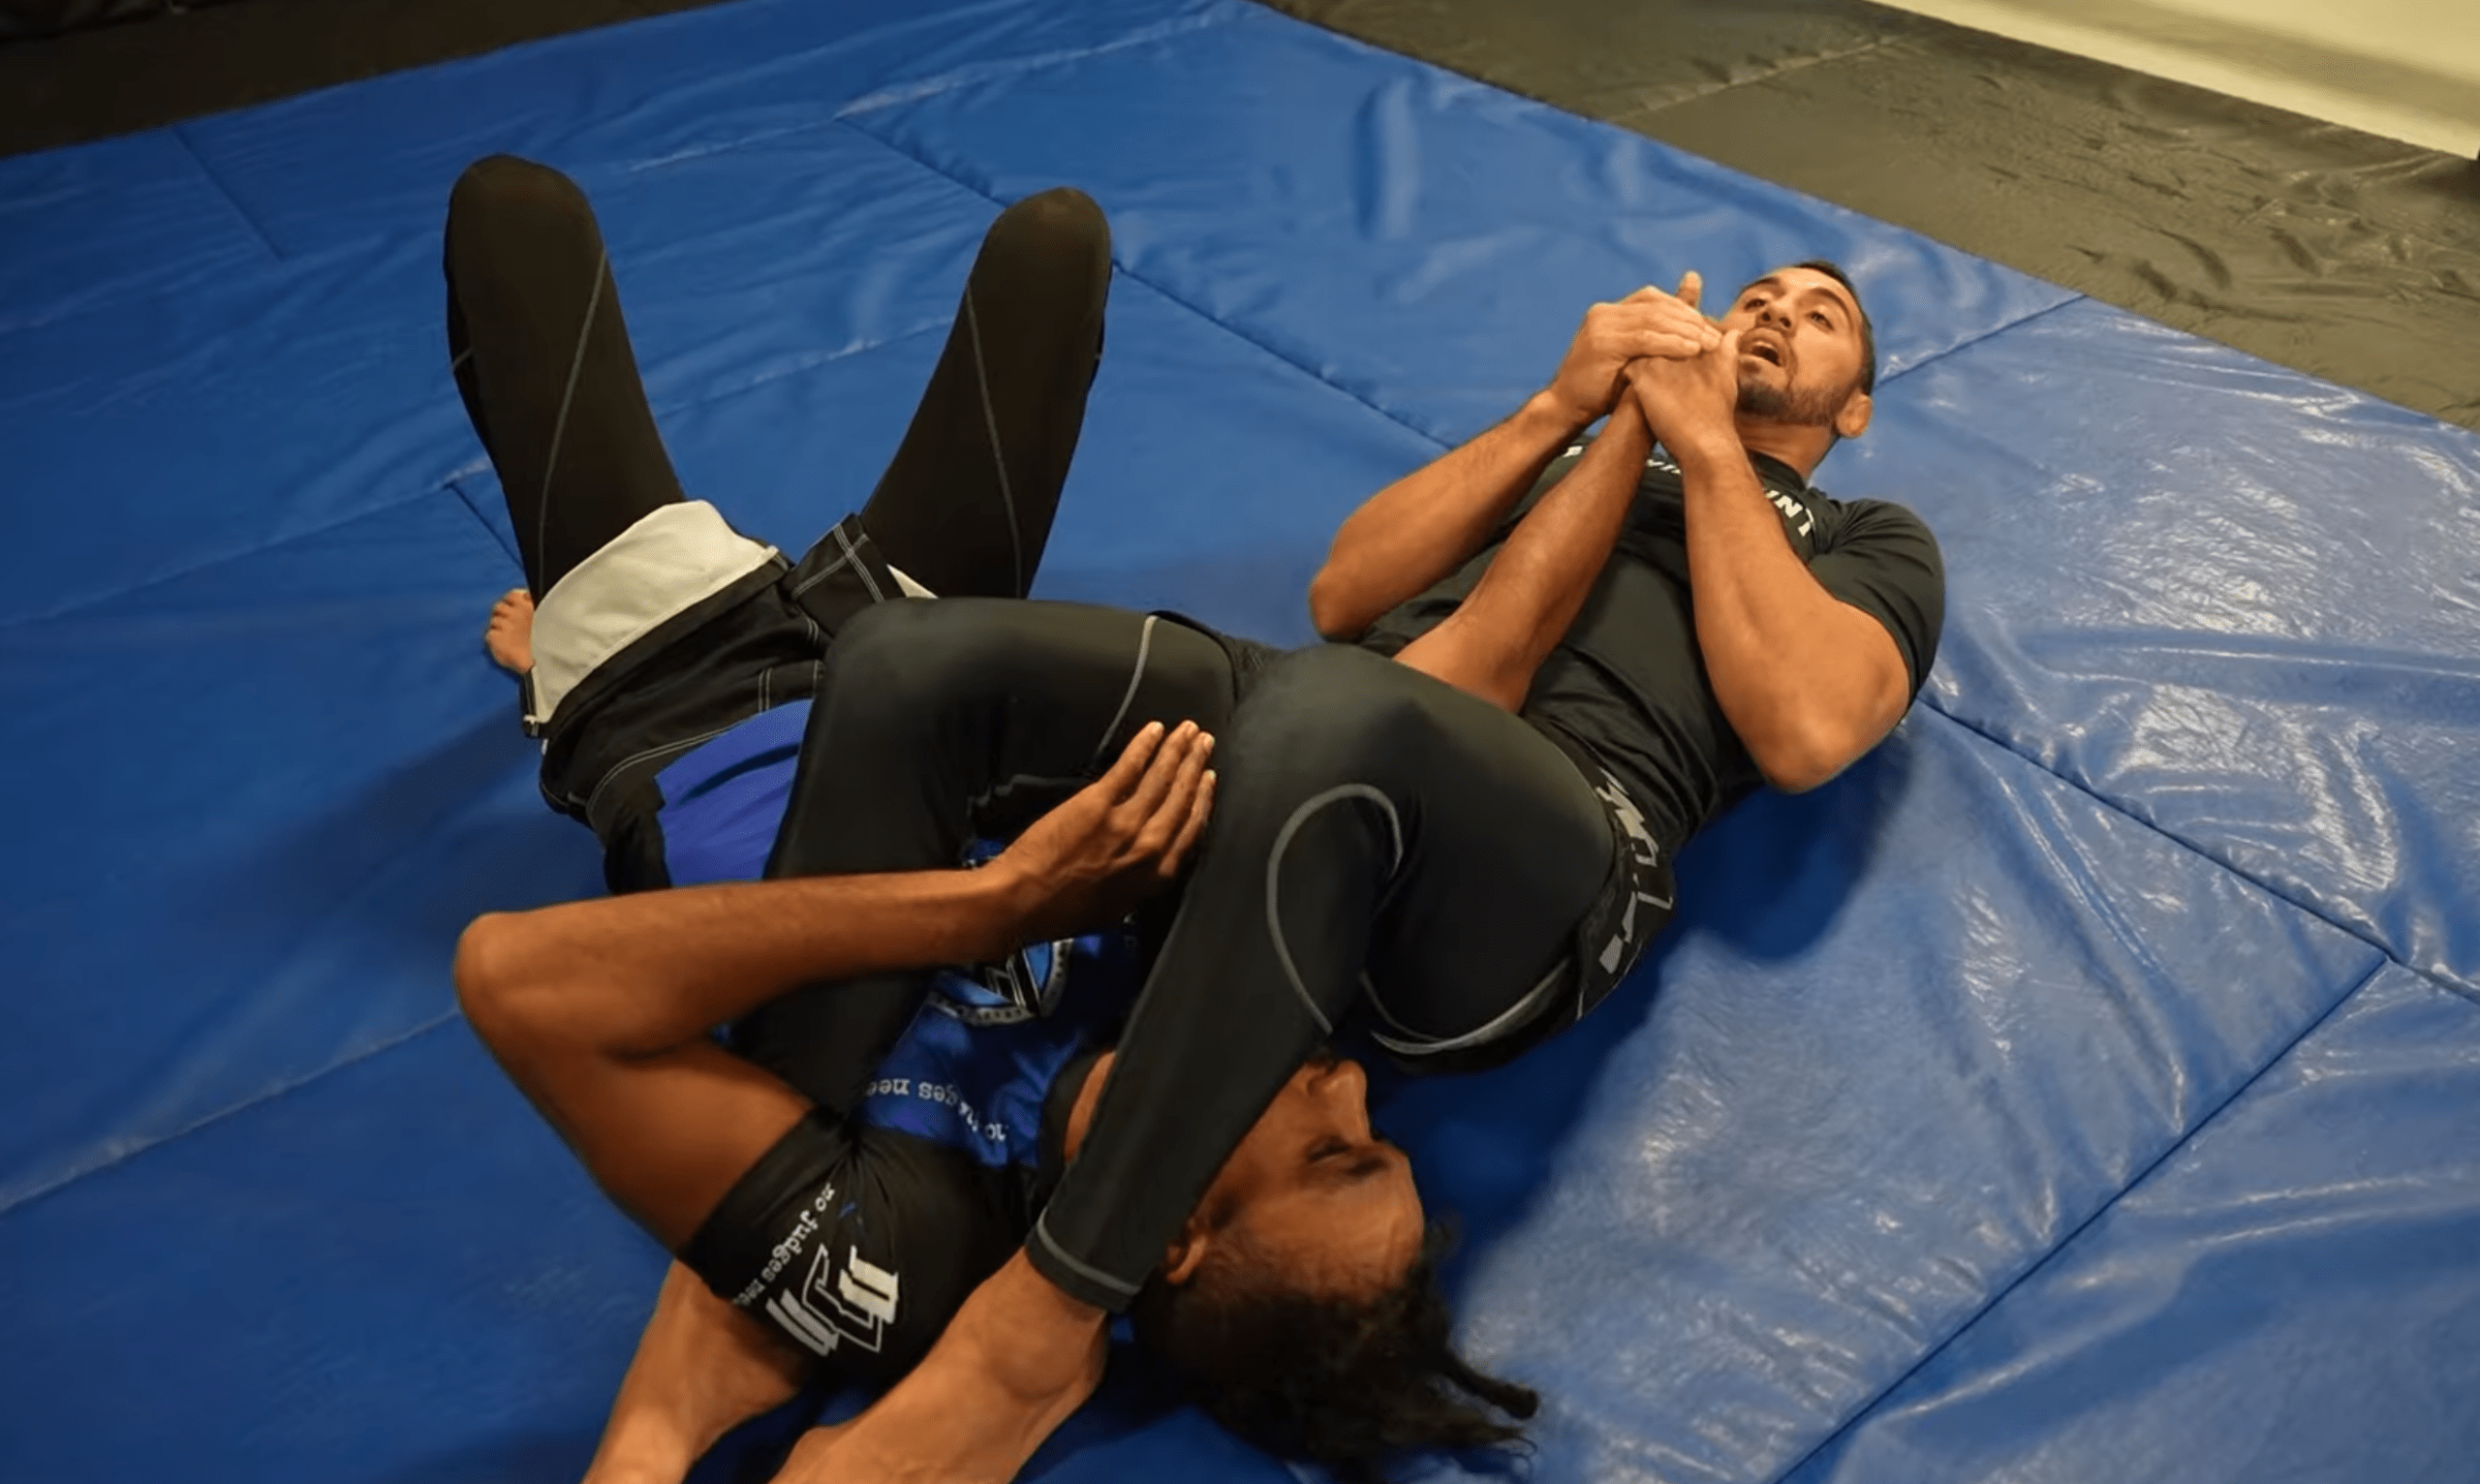
Let’s start with the most beginner-friendly: closed guard.
You’re on your back, legs wrapped around your partner’s waist. This is closed guard, and it’s one of the safest places to launch an armbar.
Here’s how:
Step 1: Break their posture.
Use your feet to push on their hips or knees. Make them lean forward. No broken posture = no attack.
Step 2: Isolate one arm.
Reach across and grab their same-side wrist. Pull it toward you. Now trap it between your bicep and chest.
Step 3: Create the angle.
Shrimp (crab-walk) to the opposite side. This opens space so you can swing your leg over their head.
Step 4: Swing your leg over.
Lift your hip slightly and bring your leg over your head. Your calf should rest snugly against their neck.
Step 5: Pinch and finish.
Squeeze your knees together, lift your hips, and arch your back. Keep their thumb pointing to the ceiling.
Pro tip: If they try to turn, adjust your leg position to block their shoulder. Stay glued to them.
I used this exact sequence to win my first no-gi match. Took me three tries that round,but when it finally clicked, it felt amazing.
You’re sitting on top,this is mount, one of the most dominant positions in BJJ.
But staying there isn’t enough. Time to attack.
Here’s how to transition smoothly into an armbar:
Step 1: Isolate the arm.
Break their frame. Use an underhook or pin their arm to their side.
Step 2: Transition to S-mount.
Shift your weight onto one knee, lifting the other foot high. This creates space to swing your leg over.
Step 3: Swing your leg over their head.
Same motion as from the guard. Bring your shin across their face, hamstring pressing into their neck.
Step 4: Fall back and finish.
Lean back, keep the wrist locked, and drive your hips upward.
Important: Don’t rush. First, remove all slack. Then explode into the finish.
I once missed an armbar from mount because I pulled too early. My coach yelled, “You’re hugging air, Steve!” He was right. I wasn’t controlling anything.
Control comes first. Power comes second.
Side control seems static,but it’s actually full of opportunities.
If your opponent defends well, don’t force it. Flow into the armbar instead.
Step 1: Shift to kesa gatame (scarf hold).
Move your chest across their upper body, controlling their near-side arm.
Step 2: Thread your leg over their head.
Swing your far leg over, just like before. Keep your hamstring tight on their neck.
Step 3: Sit through and trap the arm.
Rotate your body, bringing your hips in line with theirs. Now you’re in position.
Step 4: Finish with precision.
Lift, squeeze, and extend,same mechanics as earlier.
This one took me forever to learn. I kept falling flat on my back. But once I got the hip alignment right? Game changer.
Practice this slowly. Speed comes later.
You’ve taken their back. You’ve got the hooks in. Now what?
Instead of going straight for the choke, consider the armbar.
Step 1: Trap the seatbelt arm.
With your top hand, grab their far-side arm and pin it across their body, like a car seatbelt.
Step 2: Fall toward the underhook side.
Drop your weight to the side where you have the underhook. This drags their arm across their chest.
Step 3: Create a triangle with your legs.
Wrap your legs around their head and the trapped arm. Think of it like setting up a triangle choke, but with a different goal.
Step 4: Finish with the kimura grip and hip lift.
Grab their wrist with both hands, palms up. Push your hips up and lean back.
This variation surprised me the first time I saw it. Looked impossible. But when applied correctly, it’s brutal.
Just be careful, your balance is delicate here. One wrong move, and you could end up underneath.
Now we enter highlight-reel territory.
The flying armbar is flashy, fast, and risky.
It happens when you leap from standing, catch the arm mid-motion, and land in the finish.
How it works:
Someone shoots in for a takedown. As they dive forward, you sprawl, catch their arm, and jump, hips leading, legs wrapping.
You’re airborne for a split second… then thud,you land with full pressure.
I tried this once in practice. Landed awkwardly. Hurt my hip. Didn’t attempt it again for six months.
Why? Because timing and confidence matter.
Only attempt this after hundreds of reps on the ground. And always train with soft mats and trusted partners.
Still, when does it work? Pure magic.
One of my teammates hit a flying armbar in a local comp. The crowd went wild. Judges gave extra points for style.
So yes, it’s possible. Just don’t rush it.
You know how to do an armbar.
But how do you actually get it during a live roll?
That’s where setups come in.
The best armbars don’t look like attacks until it’s too late. They flow naturally from movement, balance breaks, and reactions.
Let me tell you a story.
Last year, I was rolling with a tough blue belt. We were stuck in the guard for minutes. No progress. Then I faked a triangle choke,just lifted one leg slightly,and he instinctively raised his elbow to block.
Big mistake.
I shot my hand in, grabbed his wrist, and rolled straight into a clean armbar. Tap in three seconds.
He said, “I didn’t even see that coming.”
Exactly.
That’s the power of setups and chains.
You don’t need perfect control to start an armbar. You just need your opponent to make a small mistake.
Here are real-life triggers:
These moments last half a second. But if you’re ready, that’s all you need.
Think of it like fishing. You don’t chase the fish. You wait, line in the water, and strike when they bite.
Same with the armbar. Stay patient. Watch for openings.
BJJ isn’t about single moves. It’s about chains,linking techniques so fast your opponent can’t catch up.
The most famous trio?
Triangle → Armbar → Omoplata.
All target the same arm. All use similar positioning. And all force tough decisions.
Here’s how it works:
It’s like a magic trick. One submission turns into another right before their eyes.
I drilled this chain 50 times in a row once. My partner tapped seven times in ten minutes. He finally yelled, “Steve, I surrender!”
Moral of the story? Repetition builds reflexes.
The armbar works in both gi and no-gi. But the way you set it up changes.
In gi BJJ, you have handles, sleeves, collars, and belts.
Use them.
In no-gi, it’s faster and slicker.
I used to struggle in no-gi because I relied too much on grips. My coach told me, “Stop waiting for the gi. Move like water.”
Now I attack earlier, faster, and more often.
So you’ve got the setup. You’re in position. Now what?
This is where most people fail, not because they don’t know the move, but because they miss the small details.
Let’s fix that.
If I could only teach one thing about the armbar, it would be this:
Keep their thumb pointing upward.
Why?
Because if their palm is face down, they can rotate out. Internal rotation = escape.
But if their thumb points to the ceiling, their elbow is locked in place, like a door that only opens one way.
I learned this after escaping dozens of armbars myself. Every time I survived, it was because I rotated my thumb down and rolled.
Once I started controlling the wrist? My success rate doubled.
So grab that wrist. Don’t let go. And keep that thumb facing the sky.
You don’t finish an armbar with your arms.
You finish it with your hips.
Pulling with your hands burns energy fast. Pushing with your hips uses leverage and wins matches.
Here’s how:
This puts maximum pressure on the elbow joint.
And here’s a pro tip: Don’t fall back too far.
If your shoulders touch the mat, you lose power. Stay on your upper back, hips high.
I used to flop backward like a turtle. Wasted so much energy. Now I stay compact, tight, and strong.
No armbar works without head control.
If their head is loose, they’ll stack you, turn you, or shrimp out.
Your hamstring must press firmly against their neck, like a seatbelt locking in place.
Also, use your free arm to frame against their shoulder or chest. This stops them from framing back.
One time, I had a deep armbar, but left space near their head. They stacked me instantly.
My coach laughed. “You gave him a ladder, Steve.”
Lesson learned: Close every gap.
Ever had someone escape by turning their palm up and rolling through?
That’s the hitchhiker escape.
To stop it:
It’s like dancing. You follow their lead but never lose control.
Practice this in drills. Make it automatic.
Let’s be honest.
We’ve all messed up the armbar.
Maybe we crossed our ankles. Maybe we lost the wrist. Maybe we just… flopped.
Here’s a quick breakdown of the most common errors and how to fix them for good.
| Poor hip alignment | No pressure on elbow | Hips directly under shoulder line |
| Crossing ankles | Easy to kick out | Keep heels down, toes active |
| Leaving space at the neck | Allows stacking | Hamstring glued to neck |
| Losing far-arm control | They frame out | Press bicep with leg (“leg press”) |
| Rushing the finish | Slack remains | Remove slack first, then explode |
Fix one mistake at a time. Master it. Then move on.
Perfection isn’t the goal. Progress is.
Now let’s flip the script.
What if you’re the one caught?
Knowing how to escape builds confidence and prevents injuries.
And trust me, you will get caught. It’s part of the journey.
Best defense? Never get there in the first place.
I used to flare my elbows like chicken wings. Got tapped a dozen times.
Now I keep them tight, like I’m hugging myself.
Small habit. Big difference.
Too late. You’re in deep.
Here’s what to do:
Stack Pass Defense:
Drive forward, putting all your weight on their chest. This lowers your hips and breaks their angle.
Hitchhiker Escape:
Rotate your palm up (like signaling a ride), tuck your chin, and roll through toward the trapped arm side.
Roll-Out Method:
Turn into your attacker, not away. Roll through and end up on top.
RNC-Grip Defense:
Clap your free hand onto your bicep, like you’re making a bicep curl. This delays the finish and buys time to escape.
I’ve used all four. Each saved me in the competition.
Remember: survival isn’t failure. It’s smart jiu-jitsu.
Sharp pain in the elbow? Tap.
Don’t test your limits with joint locks.
I’ve seen guys try to “tough out” an armbar. One snapped his ulnar nerve. Took months to recover.
BJJ is training, not war.
Tap early. Tap often. Live to roll again tomorrow.
Ready to level up?
Let’s explore some less common,but highly effective,versions of the armbar.
Opponent stacks you hard?
Instead of resisting, go with it.
Roll onto your belly while keeping the wrist grip. Use momentum to swing your leg around and finish from the bottom.
It’s counterintuitive, but it works when they least expect it.
I hit this in a night class after getting stacked five times in a row. On the sixth, I rolled through and tapped him.
Smallest guy in the room. Biggest smile on my face.
Yes, you can do an armbar from standing.
Common in self-defense or MMA.
Someone grabs your wrist? Trap it, step behind, and drop.
Just like in movies, but real.
Train it slowly. Pad the mats. And never crank it fully.
Great for controlling aggressors without causing serious harm.
From the spider guard, use sleeve pulls to break balance.
As they resist, isolate one arm and transition into an armbar.
De La Riva adds extra control; the hook prevents them from closing the distance.
I love using this against aggressive passers. They charge in… and suddenly they’re tapping.
Poetic justice.
Open your guards, lift with your hooks.
Sweep them to the side, and as they land, immediately attack the armbar.
Speed is key.
No pause. No reset. Just flow.
One motion. One submission.
Technique means nothing without repetition.
Here’s how to drill the armbar the right way.
No partner? No problem.
I do 5 minutes of solo armbar motion every warm-up. Keeps muscle memory sharp.
Start slow. Focus on form.
Do this for 10 minutes after every class.
Consistency beats intensity.
Start every round already in an armbar setup.
Goal: Finish within 30 seconds, or defend if you’re on bottom.
This builds speed, timing, and calm under pressure.
After two weeks of this, my students average 3x more submissions per week.
Try it. Thank me later.
Is the armbar useful beyond the gym?
Absolutely.
In IBJJF, armbars win matches, but don’t score points directly.
So use them after earning advantages or sweeps.
In ADCC, they’re even more powerful. No-gi means faster entries and fewer grip dependencies.
Rule of thumb:
High-percentage positions only. Save flashy attempts for warm-ups.
Grabbed from behind? Taken down?
The armbar gives you a non-lethal way to control and escape.
Apply it, create pain compliance, disengage.
It’s not about hurting, it’s about surviving.
I love art. Protect your body.
Wear elbow sleeves if you’ve had past injuries.
Warm up properly.
Communicate with partners.
Respect the technique. It saved lives and ended careers.
Watch Leandro Lo. Study Gordon Ryan. Analyze how they chain, flow, and finish.
Then go train one detail at a time.
Build your own system.
Make the armbar yours.
Q: What is Juji Gatame?
A: The Japanese name for armbar, meaning “cross lock.” Originated in Judo.
Q: Is the armbar legal in all BJJ divisions?
A: Yes, for adults. Not allowed in youth competitions (IBJJF rules).
Q: Can a smaller person finish an armbar on a bigger opponent?
A: Yes. Leverage > size. I’ve tapped 250-pound guys with proper technique.
Q: How do I avoid injuring my partner?
A: Control the pressure, respect taps, and never crank joints.
Q: Gi vs. no-gi armbar, what’s the difference?
A: Gi uses grips for control; no-gi relies on timing and underhooks.
Q: When should I learn the armbar?
A: Day one. It’s one of the first submissions taught in most schools.
Q: Why isn’t my armbar working?
A: Likely missing control or telegraphing. Drill setups slowly first.
The armbar isn’t just a submission.
It’s a lesson in patience, precision, and persistence.
It teaches us that strength doesn’t win fights, smarts do.
Whether you’re a white belt nervous about your first tournament or a black belt refining your A-game, the armbar has something to offer.
So go train it.
Drill it. Love it.
And when you finally sink one in deep?
You’ll understand why it’s been a cornerstone of BJJ for over a century.
Now over to you:
What’s your favorite armbar setup? Or your biggest struggle with it?
Drop a comment below, we read every one.
And if you found this guide helpful, share it with a training partner.
Because at Martial Boss, we believe growth happens together.
Until next time, stay safe, stay sharp, and keep rolling.