Steve MarlinUpdated:
Category:
BJJ.
I’m Steve Marlin, a Brazilian Jiu-Jitsu brown belt with over a decade of grappling under my belt (literally). I’ve choked out training partners, tapped in tournaments, and yes, gotten caught in this exact move more times than I’d like to admit.
Today, we’re diving deep into one of the most fundamental techniques in gi jiu-jitsu: the cross collar choke.
This isn’t just another submission. It’s a rite of passage. A bread-and-butter move that every single BJJ student learns early, and spends the rest of their journey mastering.
So let’s break it down step by step, from what it is to how to hit it, defend it, and make it work when it matters most.
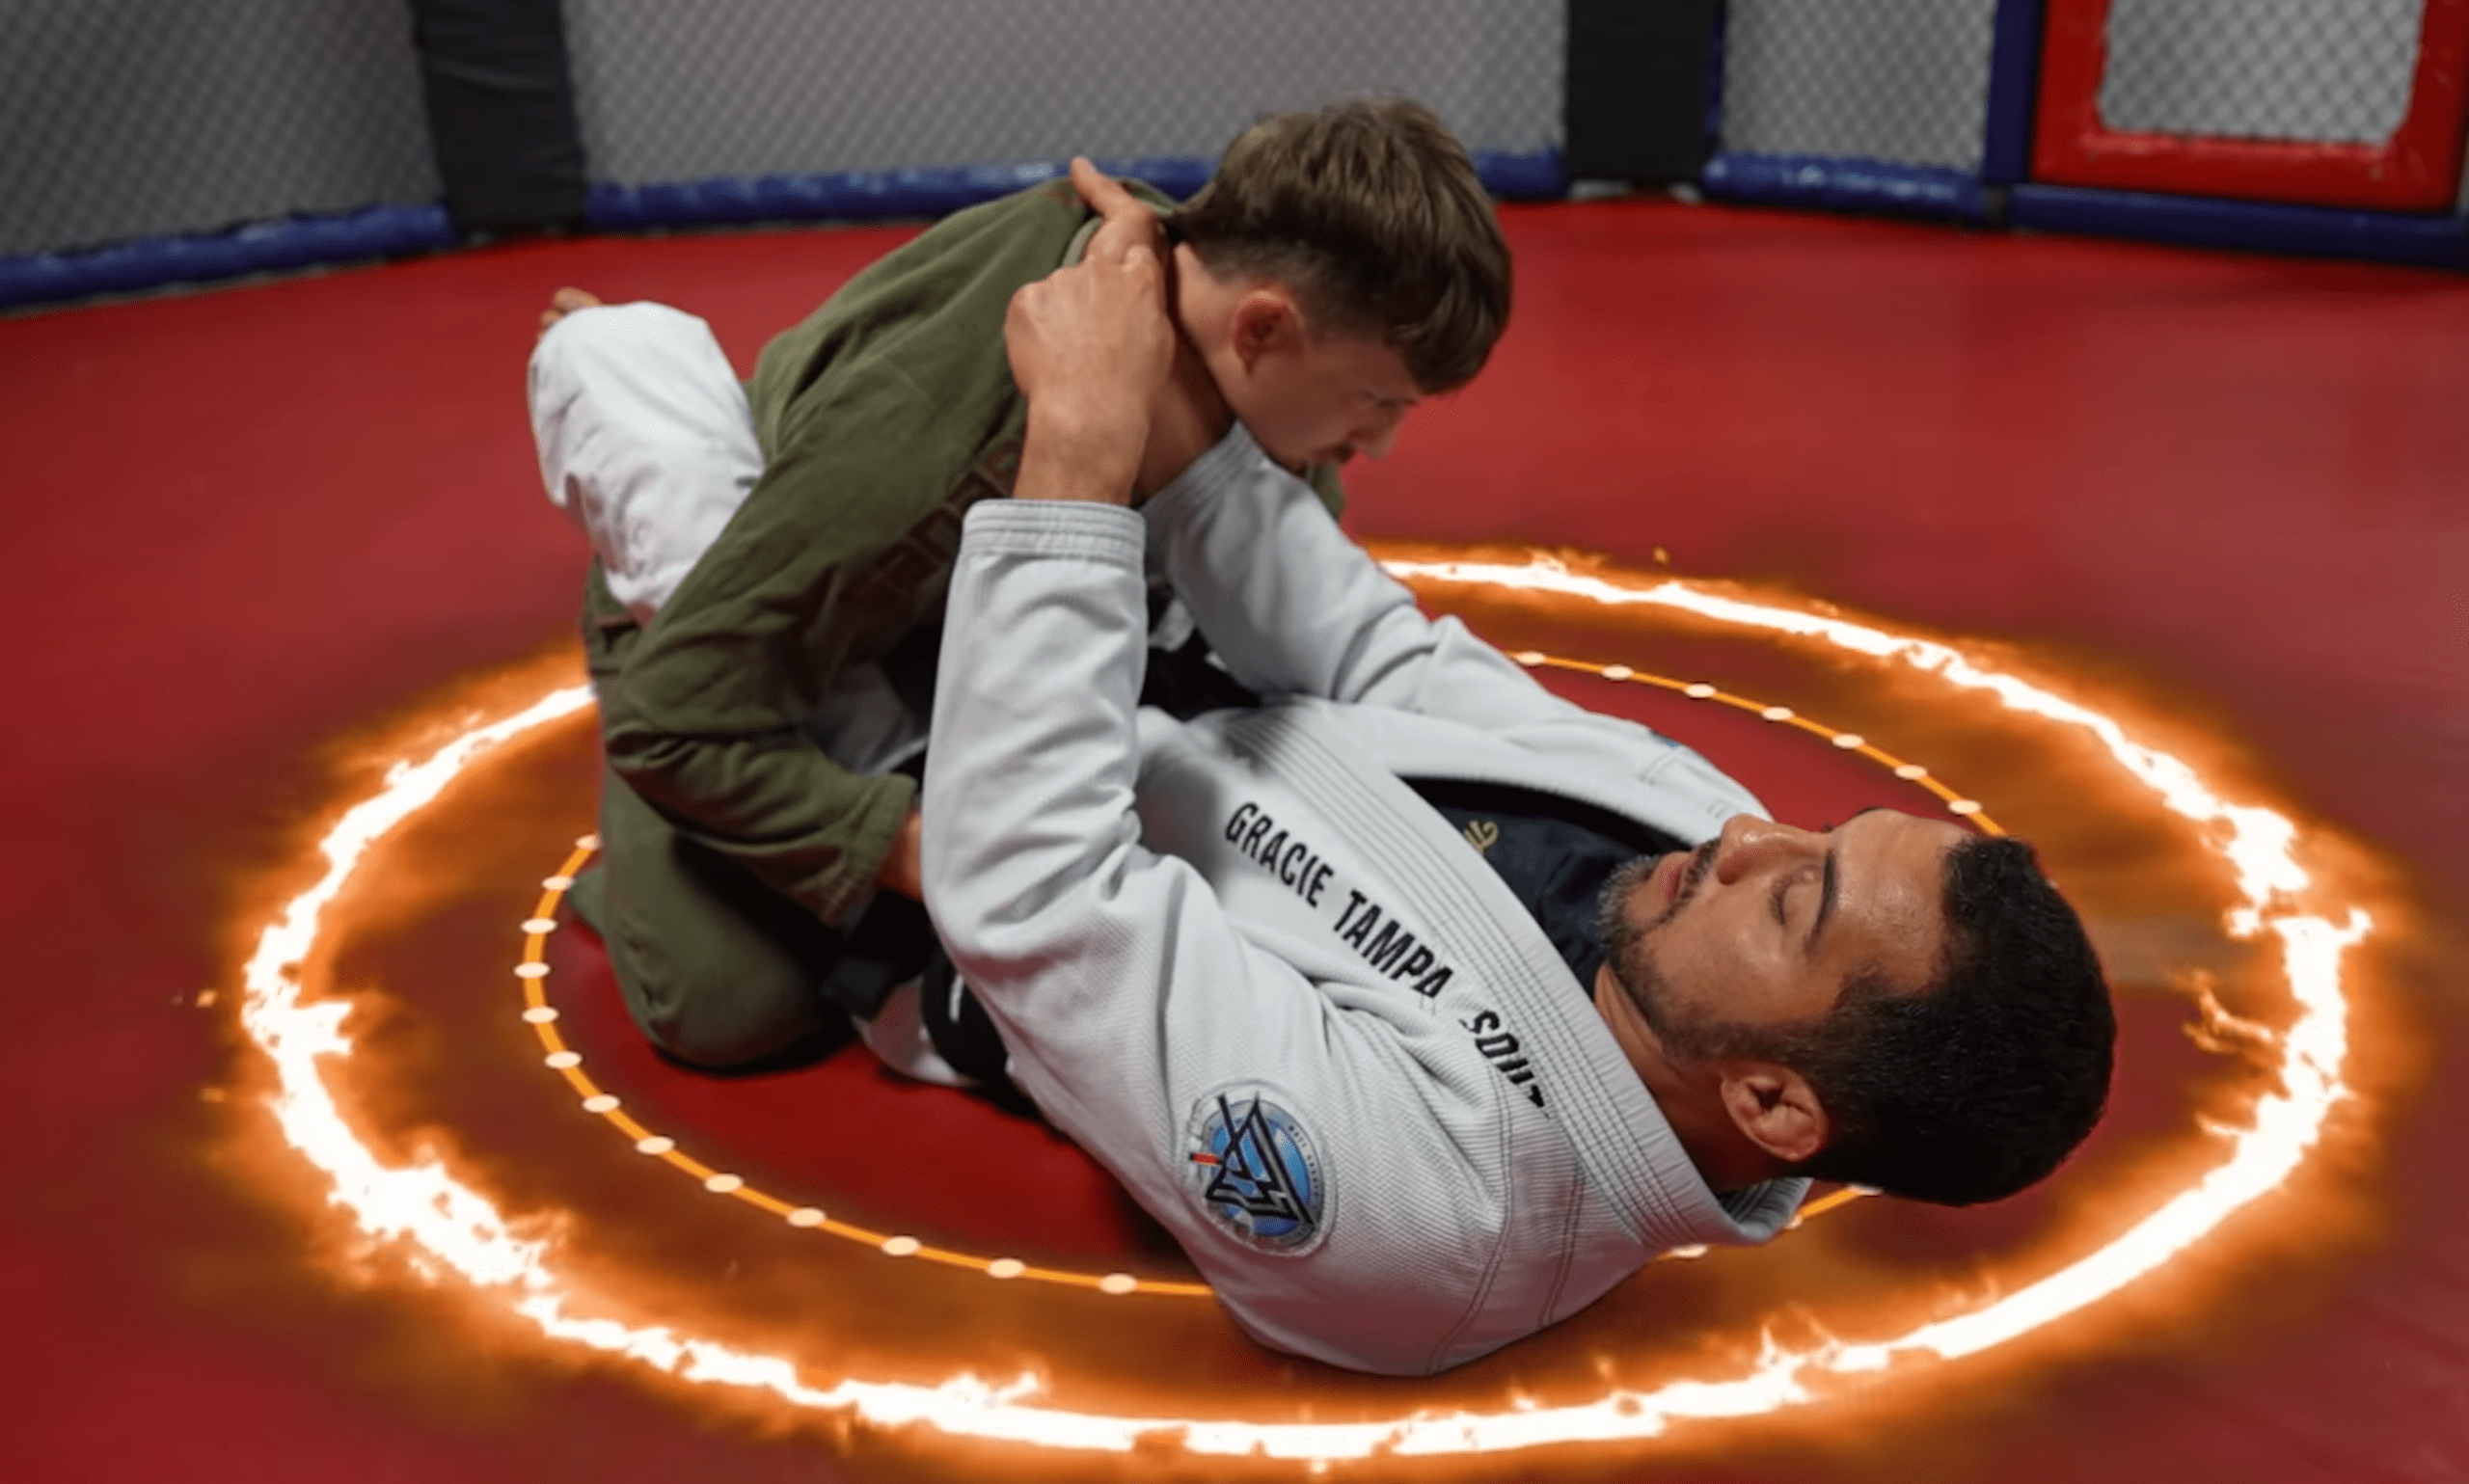
Let me paint a picture: You’re in closed guard. Your opponent leans forward. You sink both hands deep into their collars. Then, snap, you pull them down and across, forming an “X” with your arms.
Seconds later, they tap.
That’s the cross collar choke, a classic gi submission that uses your opponent’s own uniform against them.
It’s not about brute strength. It’s about precision, timing, and control.
And while it looks simple, there’s a lot happening beneath the surface.
You need the right grips, the right angle, and the right head control. Miss one piece, and the whole thing falls apart.
But get it right? It’s one of the cleanest, most satisfying submissions in BJJ.
Great question.
The name comes from the way your arms cross over each other, forming an “X” shape across your opponent’s neck.
One hand grips the far-side lapel. The other grabs the near-side. When you finish, your wrists press into the sides of their neck, like two doors closing shut on the carotid arteries.
Think of it like shutting blinds: smooth, controlled, and effective.
No wild pulling. No yanking. Just clean mechanics.
And yes, it works best in the gi. Without fabric, you lose the leverage. But don’t worry, we’ll talk about no-gi adaptations later.
Here’s something I wish someone told me as a white belt: the cross collar choke is a blood choke, not an air choke.
That means it cuts off blood flow to the brain, not breathing.
When both carotid arteries are compressed, your opponent has about 8–10 seconds before they tap, or go to sleep.
And trust me, you don’t want to be the person who puts someone out cold.
That’s why control matters more than power.
Ever seen someone panic when they feel a choke coming? They start gasping, thinking they can’t breathe. But if you explain it’s not their lungs, it’s their brain getting less blood, they relax faster. And tapping becomes safer.
Knowledge = better training.
You might be surprised: the cross collar choke didn’t start in BJJ.
It came from Judo, where it’s called Nami Juji Jime, which literally means “normal cross strangle.”
Back in the early 1900s, judokas used lapel chokes as core submissions. When the Gracies brought Judo to Brazil and evolved it into BJJ, they kept the technique, and made it even deadlier.
Now, it’s a staple in every major competition.
I remember my first time seeing it live. I was a blue belt watching a black belt roll. One second, his opponent was posturing up. The next, he was flat on his back, tapping with wide eyes.
I thought, “I need to learn that.”
Spoiler: It took me months to get it right.
But once I did? Game-changer.
Let’s geek out for a second, just a little.
Your neck has two main targets for chokes:
The cross collar choke aims for the arteries.
When you apply pressure with both lapels, you compress those arteries against the spine.
No blood → no consciousness → quick tap.
But here’s the kicker: it only takes about 4.5 pounds per square inch to shut down blood flow.
That’s less than the weight of a basketball.
So why do so many people fail?
Because they use muscle instead of mechanics.
They pull with their arms instead of rotating their wrists.
They forget head control.
They leave slack in the gi.
And then they wonder why nothing happens.
Try this at home: grab your shirt collar and pull.
Feel how weak it is?
Now imagine that same fabric woven into a thick cotton gi, tightly knotted around your neck.
Suddenly, it becomes a weapon.
The gi gives you three things:
Without the gi, you lose all of that.
That’s why the cross collar choke doesn’t exist in no-gi.
But, big but, the principles do.
The same wrist rotation? Used in the guillotine.
The same head control? Critical in the rear-naked choke.
So even if you mostly train no-gi, learning the cross collar choke makes you better at everything else.
Alright, let’s get practical.
You’re on your back, legs wrapped around your partner’s waist. They’re sitting up, trying to pass your guard.
This is prime real estate for the cross collar choke.
Here’s how to set it up, step by step.
You can’t choke someone standing tall.
So first, pull them forward. Make them hunch over.
Use your legs to squeeze their hips. Push your feet into their lower back.
Get them low, nose almost touching your chest.
If they’re upright, you’re wasting energy.
I learned this the hard way. I used to try the choke while they were still standing up. Never worked.
Once I broke their posture? Everything changed.
Reach up with your dominant hand.
Open their lapel. Slide four fingers inside, thumb pointing out.
Now push your hand deep, knuckles should touch the mat behind their neck.
Not halfway. Not close. All the way.
If you can see daylight between their neck and your palm? Too shallow.
A deep grip is non-negotiable.
I used to think “good enough” was fine. My instructor slapped my hand off the collar and said, “Either go deep or don’t go at all.”
He was right.
Now comes the tricky part.
Take your other hand and slide it under your first arm.
Grab the opposite lapel, this time, thumb-in.
Your arms now form an “X” across their throat.
Keep your elbows tight to your body. Don’t flare them out.
And don’t let them frame against your biceps. If they do, strip it fast.
I once lost a choke because I let my elbow drift outward. My partner stacked me like a pancake.
Lesson learned: elbows in, always.
This is where most people mess up.
They start pulling their hands toward their chest like they’re rowing a boat.
Wrong.
Instead, rotate your wrists inward, like you’re starting a motorcycle.
Pull one wrist down, push the other up.
At the same time, lean back slightly and pinch your elbows together.
Think of it like turning two knobs at once.
And keep your head tight to theirs. Use your forehead to block their chin from lifting.
If you do it right, they’ll tap before they even know what hit them.
Now let’s switch positions.
You’ve passed their guard. You’re sitting high on their chest. They can’t move.
Perfect.
Time to finish.
From mount, the cross collar choke is even more powerful, because you already have control.
Here’s how to do it right.
Don’t sit up. Keep your hips low, chest pressed down.
The heavier you are, the harder it is for them to escape.
I used to bounce around on top, showing off. Big mistake.
Stay grounded. Be boring. Be effective.
Reach across their body with your dominant hand.
Slide deep into the far collar, again, knuckles past the neck.
This grip does the heavy lifting.
If you miss it, the choke fails.
So take your time. Strip any frames. Create space if needed.
Now bring your other hand underneath your first arm.
Grab the near lapel, thumb-in.
Yes, your arms are crossing again. That’s the point.
Keep your elbows tucked. Protect your arms from being stripped.
And keep your head low, drop it toward the choking side to add pressure.
I once saw a guy lose the choke because he lifted his head like he was looking for the exit sign.
Spoiler: the exit was the tap.
Now, same motion: rotate wrists, pinch elbows, lean slightly.
Drop your head to the side like you’re nuzzling their shoulder.
This small move prevents them from turning or stacking.
And it adds just enough extra pressure to seal the deal.
Remember: slow and steady wins the race.
No jerking. No panic.
Just clean, calm pressure.
You’ve got the grips. You’re applying pressure. But nothing happens.
Sound familiar?
I’ve been there. More times than I can count.
The cross collar choke looks simple. But tiny errors can ruin it completely.
Let’s break down the most common mistakes and how to fix them fast.
This is Public Enemy #1.
If your hand isn’t deep behind the neck, knuckles touching the mat, you’re not choking anyone.
A shallow grip means no leverage. No compression. Just arm fatigue.
Fix: Use your free hand to “feed” the lapel deeper. Or wait for your partner to posture up, then slide your hand in as they lean forward.
Pro tip: Practice gripping on a dummy gi or even a rolled-up towel at home. Muscle memory matters.
Big arms don’t win chokes. Wrist rotation does.
Pulling straight back just strains your shoulders and gives your opponent space to defend.
Fix: Turn your wrists like you’re starting a motorcycle. One palm faces down, the other up. Pinch elbows in. Let the gi do the work.
I used to yank like I was opening a stuck jar. My coach said, “You’re not trying to rip their head off. You’re putting them to sleep.”
That changed everything.
If their chin is up, the choke isn’t on.
Head control is half the battle. Without it, they’ll turn, stack, or shrug it off.
Fix: Trap their head with your bicep or chest. Drop your own head to the side of the choke. Think of it like a seatbelt across their face.
One drill I love: practice finishing the choke while holding a tennis ball between your forehead and theirs. If it drops, you lost control.
Flared elbows = weak choke.
They create space. They make you vulnerable to frames. And they let your opponent strip your grips.
Fix: Keep elbows tucked to your ribs, like you’re hugging yourself.
Imagine you’re squeezing a basketball between your elbows. That pinch is what cuts off blood flow.
Loose fabric? That’s free space for your opponent to survive.
Even an inch of slack can be the difference between a tap and a counter.
Fix: Before finishing, “climb” the lapels with your fingers. Remove all slack. Then rotate and squeeze.
Another trick: Do a quick “motorcycle rev” motion to tighten the choke at the last second.
It catches people off guard, literally.
Now let’s flip the script.
What if you’re the one getting choked?
Don’t panic. There are ways out, if you act early.
Let me walk you through the three stages of defense.
Best defense? Never let it happen.
Keep your chin down. Hands up. Fight the collar early.
If they reach for your lapel, slap their hand away. Strip the grip immediately.
Don’t wait. Don’t hope.
Hand fighting is your first line of defense.
I once tapped five times in a row because I kept letting my partner get the first grip. After that, I made a rule: no hands on my collar without a fight.
My rolls improved overnight.
They got one hand in. Now what?
Time to act fast.
Use both hands to “pluck” their wrist or thumb off your collar.
At the same time, frame against their bicep with your forearm.
Create space. Break the angle.
This move is called the “pluck and push.” It’s simple, effective, and saves taps.
If you feel the choke starting, don’t just pull on their arms. That plays into their strength.
Instead, disrupt the mechanics. Break the “X.”
Choke is locked. Pressure is building. You’re fading.
Now it’s survival mode.
Your best bet? Trap one of their arms.
Slide your hand between their arm and your neck. Create a gap.
Then shrimp hard to the side, toward the trapped arm.
This relieves pressure and may give you enough space to escape.
Another last-ditch option: the “praying hands” defense. Press your palms together under their wrists to push them apart.
It doesn’t always work, but it buys a few precious seconds.
And remember: tap early.
Better to live to roll another day than to wake up on the mat.
Once you’ve mastered the basics, it’s time to level up.
The cross collar choke isn’t just one move, it’s a family of techniques.
Here are the most useful variations.
What if one of your arms is trapped?
No problem.
You can still finish with just one hand, if you use the gi correctly.
Wrap your single grip high and deep. Use your body weight to press their head sideways.
Then rotate your wrist like normal. The gi fabric does the rest.
It’s weaker than the two-hand version, but it works in scrambles or when you’re pinned.
Fail the cross collar choke? Great, now go for the loop.
Keep your far-side grip. Swing your other arm over their head like a lasso.
Now you’ve got a loop choke.
This combo is deadly. Top players like Marcelo Garcia use it constantly.
Drill this transition until it’s automatic.
From closed guard, you can mix collar grips with sleeve control.
Grab one collar. Wrap your other arm’s sleeve across their throat.
Now squeeze, same motion as the cross collar.
It’s not a pure X-choke, but it uses the same principles.
And it works even if they defend the second collar.
Never go for a submission alone.
Always have a plan B.
If the cross collar choke fails:
For example: they post their hand to stop the choke? Isolate that arm and attack the elbow.
Or if they turn away, follow with a back take.
Chokes open doors. Be ready to walk through them.
You might wonder: Is this move actually used at the top level?
Yes. And often.
Let’s talk about how it fits into real fights.
Yes, 100% legal in IBJJF, ADCC, UAEJJF, and most major rulesets.
But there’s a catch: no pants + collar grip.
If you grab their pant and collar at the same time, you’ll get a warning, or lose points.
So keep your hands clean. Focus on collar-to-collar only.
Studies show the cross collar choke ranks in the top 10 most-used submissions in gi competition.
Highest success from:
It’s especially popular among technical, control-based players.
Why? Because it rewards patience and precision, not speed or strength.
Not all gi chokes are created equal.
Here’s how the cross collar choke stacks up.
| Cross Collar Choke | Guard, Mount | Medium | Most fundamental, highest percentage |
| Bow and Arrow | Back Control | High | Needs flexibility; powerful stretch |
| Ezekiel Choke | Closed Guard | Medium | Works in no-gi too; sneaky |
| Bulldog Choke | Front Headlock | Medium | Underused but effective |
Bottom line: The cross collar choke is the foundation. Learn it first. Master it. Then explore the rest.
Knowledge means nothing without practice.
Here’s how to train the cross collar choke the right way.
No partner? No problem.
I spent 10 minutes a day doing this as a white belt. By blue, I had rock-solid collar control.
Start slow. Build muscle memory.
Make it a habit. Not an afterthought.
First, learn the motion. Then add resistance.
Never skip steps.
If you start sparring the choke too soon, you’ll develop bad habits.
Wait until your technique is clean. Then let your partner defend fully.
Progressive resistance builds real skill.
BJJ is safe when we respect each other.
The cross collar choke is powerful. Use it responsibly.
Don’t crank it. Don’t rush.
Build pressure slowly. Watch for the tap.
If someone goes limp, release immediately.
Better to under-challenge than to injure a teammate.
Feeling pressure? Tap.
Don’t tough it out.
There’s no shame in tapping to a good choke. There is shame in passing out and missing the next round.
Tap like you mean it, clear and loud.
Most injuries come from:
Prevent them by:
And never roll with an old injury. Heal first. Roll later.
Let’s clear up the most common questions.
No. It requires a gi.
But the mechanics apply to other chokes, like the guillotine or D’Arce.
So learning it makes you better at no-gi too.
Only if applied recklessly.
Used correctly, it’s one of the safest chokes, because it works fast with little pressure.
Just tap early and respect your partner.
Day one.
It teaches grip fighting, head control, and submission mechanics.
White belts, blue belts, black belts, all use it.
Depends on drilling.
With consistent practice, you can hit it reliably in 3–6 months.
Mastery? That takes years. But the journey is worth it.
Look, the cross collar choke isn’t flashy.
It won’t win you “best technique of the night” at a seminar.
But it will win you matches.
It’s reliable. It’s fundamental. And it works at every level.
I’ve seen white belts submit black belts with a clean X-choke.
All because they focused on the details: grip depth, head control, rotation.
So here’s my challenge to you:
Next time you roll, hunt the collars.
Break posture. Get deep. Finish calm.
And when they tap?
Smile. Because you just leveled up.
Got questions? Struggles? Favorite setups?
Drop them in the comments below. I read every one.
And if you found this guide helpful, share it with your training partners.
Because at Martial Boss, we believe: Stronger teams make stronger martial artists.
Until next time, keep rolling, keep learning, and keep chasing that perfect choke.