Steve MarlinUpdated:
Category:
BJJ.
Today, we’re diving deep into one of the most feared—and most effective—submissions in grappling: the Kimura lock.
I remember my first time getting caught in a Kimura. I was a brand-new white belt, proud of my “strong arms,” thinking I could muscle out of anything. Then Coach Dan tapped me with a slow, controlled twist from side control. No flare, no drama—just pain. And respect.
That moment changed how I saw technique over strength. And today, I’ll show you why the Kimura isn’t just a submission—it’s a game-changer.
Let’s break it down step by step.
The Kimura lock is a shoulder submission that traps your opponent’s arm and twists it behind their back, forcing their shoulder to rotate inward painfully.
Think of it like trying to turn a car key when it’s already stuck. That grinding feeling? That’s what the Kimura creates—in their joint.
It’s used in BJJ, MMA, wrestling, and self-defense, and works whether you’re on top, on bottom, or even standing.
Why do so many elite fighters love it?
Because it doesn’t just win matches—it controls them.
Even if you don’t finish the tap, the threat of the Kimura opens doors to sweeps, back takes, and other attacks.
And here’s the best part: You don’t need to be big or strong to make it work.
I’m 5’9”, 160 lbs—nowhere near the biggest guy on the mat. But after mastering the Kimura, I started submitting blue belts regularly… including one dude who outweighed me by 40 pounds.
Spoiler: He didn’t see it coming.
H3: Masahiko Kimura vs. Hélio Gracie – The Fight That Started It All
Back in 1951, a Japanese judo legend named Masahiko Kimura traveled to Brazil to fight Hélio Gracie, one of the founders of Brazilian Jiu-Jitsu.
No gloves. No cage. Just two masters testing their arts.
Kimura won badly. He broke Hélio’s arm during the match. And while he didn’t use the exact modern version of the Kimura lock, he used a similar shoulder entanglement called gyaku ude-garami in Japanese.
Out of respect, the Brazilians renamed the move after him.
So yes—the Kimura lock was born from a real fight between giants.
And no, Kimura didn’t invent it out of thin air. But his dominance made it legendary.
Funny story: I once told a new student this history before class. He looked at me and said, “Wait… so someone got their arm broken, and now we celebrate it?” I laughed and said, “Yep. Welcome to BJJ.”
In Japan, the technique was always part of judo’s arsenal, but mostly as a pinning tool or transition—not a primary submission.
But in Brazil? They turned it into a weapon.
BJJ players realized that with the right grip and hip movement, the Kimura could end fights fast—even against bigger opponents.
Then came MMA.
Fighters like Frank Mir, Khabib Nurmagomedov, and Gordon Ryan started using it in high-stakes matches.
Now? It’s everywhere.
From kids’ classes to ADCC superfights, the Kimura is a staple.
And here’s why that matters for you: If the pros rely on it, you should too.
Let’s get technical—but keep it simple.
The Kimura uses what’s called a figure-four grip. That means you lock your hands together in a way that forms the shape of the number “4.”
Here’s how:
This creates a mechanical advantage—like a wrench turning a bolt.
Your body becomes the tool. Their shoulder becomes the bolt.
And when you rotate your hips? That’s torque.
You’re not pulling with your arms. You’re steering with your core.
I used to think I had to “crank” the Kimura hard. Bad idea. Once, I pulled too fast on a partner—and he tapped, but later said his shoulder felt “twitchy” for days.
Coach pulled me aside and said, “Steve, you’re not a truck engine. Use your hips, not your ego.”
Lesson learned.
The Kimura attacks the shoulder joint, especially the rotator cuff and ligaments that hold the arm in place.
It forces internal rotation—meaning the arm turns inward, past its natural range.
At full extension, the pressure becomes unbearable. Tap—or risk injury.
Yes, it can hurt the elbow too, especially if your opponent resists.
But the main target? The shoulder.
Imagine trying to twist your arm behind your back while someone sits on your hips.
That’s the kind of leverage the Kimura creates.
And because it isolates one arm, it also shuts down half of your opponent’s defense.
One arm trapped = one arm left to fight.
And in grappling, that’s a losing battle.
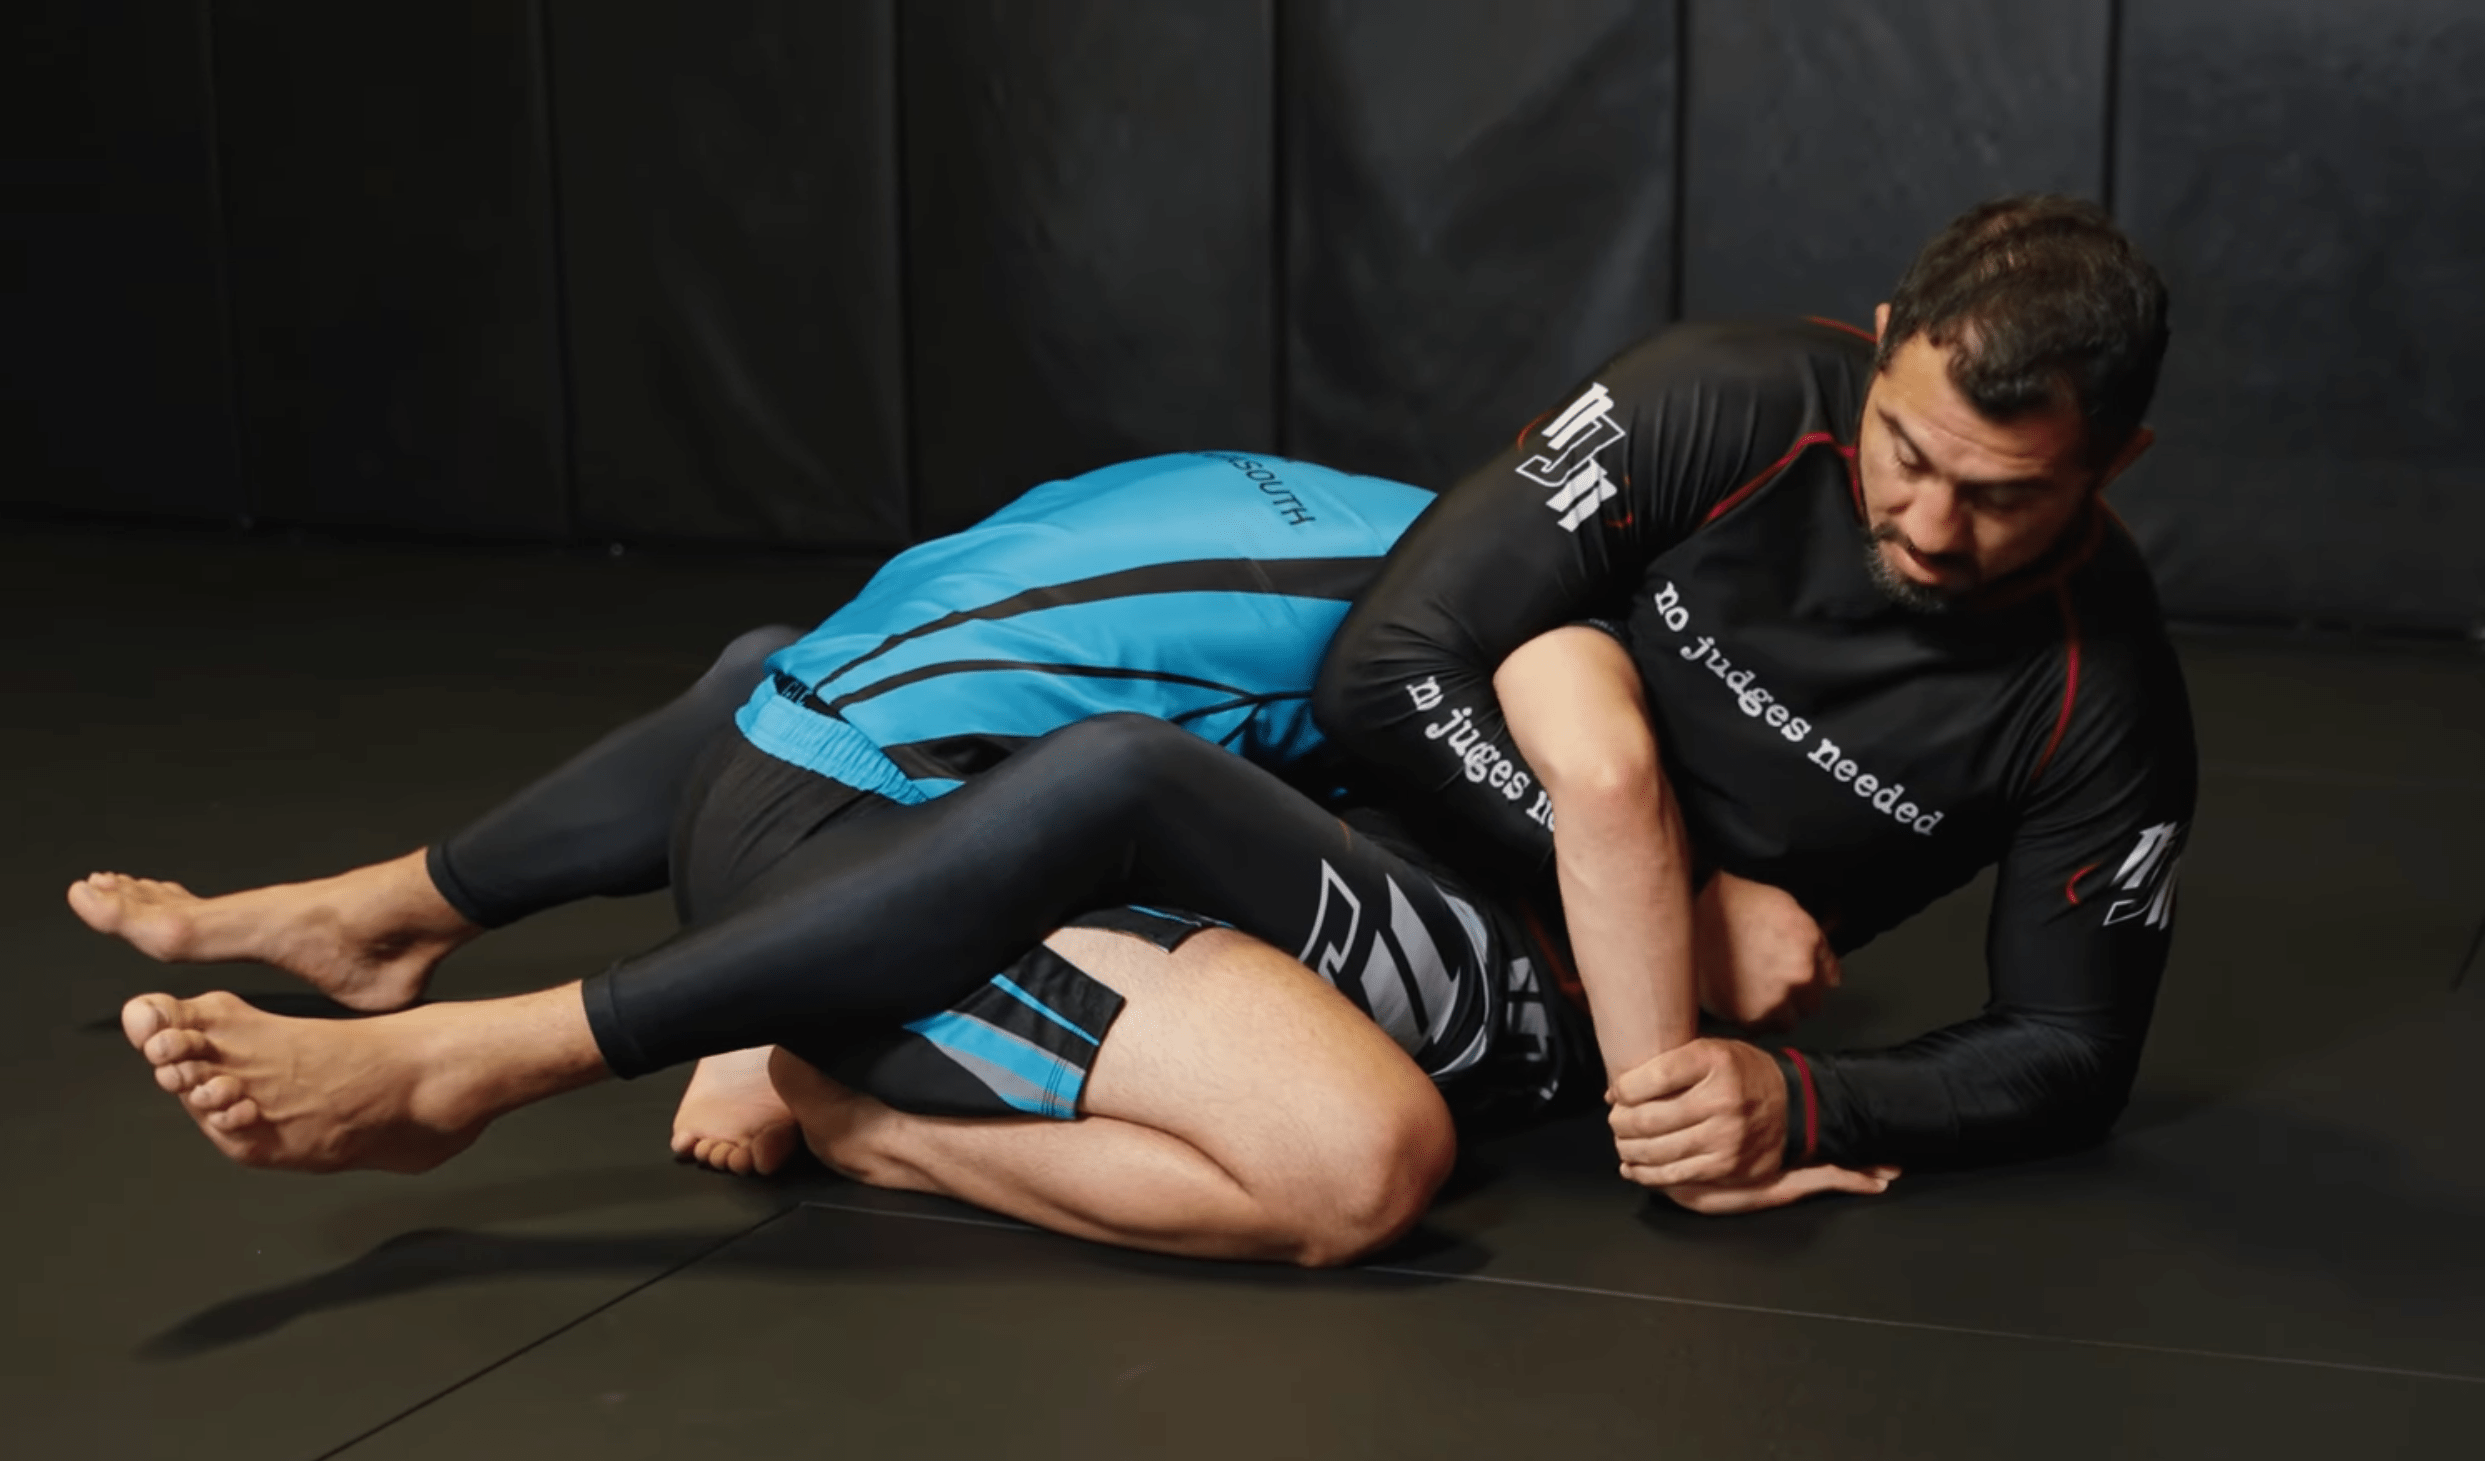
You’re on your back, they’re in your guard. Now what?
Step 1: Break their posture
Use your feet on their hips or underhooks to pull them forward. Make them lean.
Step 2: Isolate one arm
Reach across and grab their same-side wrist (e.g., your right hand grabs their right wrist).
Step 3: Secure the Kimura grip
Slide your left arm under theirs, then lock hands. Keep your elbows tight.
Step 4: Cut the angle and finish
Swing your legs to the opposite side, roll toward their head, and rotate your hips up.
Pro tip: Don’t rush. Let the pressure build slowly.
I once missed a Kimura because I tried to “explode” into it. My partner rolled right through me.
Now I wait. I settle. I squeeze like a python.
And more often than not—they tap.
This is one of the cleanest setups.
Step 1: Control their body
Keep your chest heavy on theirs. Prevent them from shrimping or framing.
Step 2: Freeze one arm
Use your forearm to pin their arm across their body.
Step 3: Secure the grip
Reach over, grab their wrist, thread your other arm under, and lock hands.
Step 4: Walk and rotate
Step your far leg over their head, walk your hips toward their shoulders, and lift.
Key point: Your hips do the work—not your arms.
Think of it like closing a car door. You don’t yank it shut. You push it smoothly.
Same here.
Apply steady pressure until they have no choice but to tap.
They’re on hands and knees? Perfect.
Step 1: Secure an underhook
Get your arm under theirs, deep into their armpit.
Step 2: Grab the wrist
Reach across and take their wrist with your free hand.
Step 3: Thread and trap
Bring your head to the mat or step your leg across to block their hip.
Step 4: Lift and rotate
Lift their arm up and backward while rotating your torso.
This one feels brutal when done right.
I once caught a teammate in turtle during live rolls. He said later, “I didn’t even feel you set it up. Suddenly, my arm was gone.”
That’s the power of timing and precision.
I once used a standing Kimura in a self-defense drill. Guy grabbed my shirt—I trapped his arm, twisted, and spun him to the ground. No strikes needed.
Control beats chaos every time.
Let’s troubleshoot.
Mistake #1: Weak grip
If they can pull their wrist free, your grip is loose.
Fix: Use a “no-thumb” motorcycle grip. Wrap your fingers tight—like you’re holding a hammer.
Mistake #2: Using arm strength
You’re not a gorilla. Stop pulling.
Fix: Rotate with your hips. Imagine you’re wringing out a wet towel.
Mistake #3: Losing body control
You’re so focused on the arm, you forget the rest of them.
Fix: Pin their hips with your legs or chest before finishing.
I used to make all these mistakes.
Now, I drill the Kimura three times a week. Slow. Clean. Perfect.
And it shows.
Here’s a secret most beginners miss:
The Kimura isn’t just a submission—it’s a control system.
Once you secure the grip, your opponent can’t move freely. Their whole body has to react to your threat.
This is what coaches call a “position before submission” mindset.
And elite grapplers use it masterfully.
For example, if I have the Kimura grip from bottom half guard, my partner can’t just stay put. They have to defend—usually by turning their shoulder or rolling away.
But here’s the trick: I want them to roll.
Because when they do, I’m ready with a sweep or back take.
Or maybe I let go mid-roll and transition into an armbar.
I once tapped a blue belt this way. He rolled to escape the Kimura—I followed him like a shadow—and extended into a straight armbar.
He said, “Wait… you planned that?”
Yep. That’s the power of the Kimura trap system.
It’s not one move. It’s a web of attacks.
Once you have the Kimura grip, always think: What’s next?
Here are three high-percentage chains:
I drill these chains every Thursday during position sparring.
Start with the Kimura grip. Then flow through the transitions slowly.
Your body will learn faster than your brain.
Not all Kimuras are the same.
Let’s break down the most effective variations.
Biggest question I get: “Steve, what’s the difference between a Kimura and an Americana?”
Great question.
Same figure-four grip. Opposite direction.
Think of it like opening a jar:
Both hurt. Both work.
But only one is the Kimura.
Don’t mix them up—or you’ll look silly in class. Trust me, I did.
You don’t need to be on the ground to use this.
In wrestling, the standing Kimura sets up throws like the hip toss or suplex.
In self-defense? Even better.
Imagine someone grabs your wrist. Instead of pulling back, step in, trap their arm, and twist.
Sudden pain = sudden compliance.
I used this in a scenario drill once. Guy grabbed my jacket—I trapped his arm, spun him, and pinned him with control.
No strikes. No yelling. Just clean technique.
That’s why I teach it to my nephew. At 15, he’s small—but he knows how to use leverage.
For no-gi players, this one’s gold.
During scrambles, if you see an arm exposed, shoot for a quick Kimura grip.
Even if you don’t finish, it can lead to a twister.
How?
Secure the Kimura grip from turtle, then roll over your partner’s head while keeping the arm trapped.
As they flip, their spine twists—and boom. Twister setup.
Gordon Ryan uses this combo in competition.
It’s not flashy. It’s effective.
And now, it can be yours.
Okay, real talk.
So far, we’ve focused on attacking.
But what if you’re the one getting locked up?
Let’s fix that.
Escaping the Kimura is about timing, positioning, and knowing the stages of defense.
If they haven’t grabbed your wrist yet—stop them now.
I tell new students, “Your arms are like doors. Keep them closed until you want to open them.”
Simple. Works.
They have the grip, but haven’t turned yet.
Do this:
One of my favorite escapes?
The forward roll.
When they start turning you, help the roll. Roll into them, not away.
Use their momentum. Pop out on the other side.
I escaped a black belt this way last month. He laughed and said, “Nice roll.”
Flattery and survival? Yes, please.
Too late? Pressure is building?
Try the hitchhiker escape.
Turn your thumb upward—like you’re hitchhiking.
This changes the angle of stress and can relieve enough pressure to slip out.
It’s a desperation move, but it works.
I’ve used it twice. Both times, I felt like a martial arts Houdini.
Not graceful. But effective.
Now, how do you practice this without hurting anyone?
Simple: Drill smart.
I do 5 minutes of shadow Kimuras every morning. Builds muscle memory.
Key rule: Communicate.
Say “grip” when you have it. Say “tap” when you feel pressure.
Respect builds better grapplers.
Look.
The Kimura can injure shoulders fast.
Rotator cuff tears. Labral damage. Long-term pain.
So follow these rules:
I had a teammate ignore this. Hurt his partner’s shoulder. Got kicked out of open mat.
Not worth it.
Be the guy people want to roll with—not the one they avoid.
Let’s clear the air.
Q: Is the Kimura legal in BJJ tournaments?
A: Yes, in adult divisions. But kids’ divisions often ban joint locks. Always check the rules.
Q: Can flexible people escape easily?
A: They might resist longer, but proper mechanics still work. Focus on control and hip movement.
Q: Why is it called the “chicken wing”?
A: Slang term. When your arm is bent and trapped, it looks like a drumstick. Hence: chicken wing.
Q: Can I use the Kimura in self-defense?
A: Absolutely. Especially standing. It controls aggressors fast and creates escape windows.
Q: How long does it take to master the Kimura?
A: With weekly drilling, you can apply it effectively in 3–6 months. Mastery takes years. But progress? Starts today.
Look.
You don’t need to be the strongest, fastest, or biggest person on the mat.
You just need one good technique.
And the Kimura lock might be the best one you’ll ever learn.
It’s historic. It’s versatile. It’s proven.
From Masahiko Kimura’s legendary match to Khabib’s dominance in the UFC—this move stands the test of time.
So here’s my challenge:
This week, drill the Kimura in three different positions.
Guard. Side control. Turtle.
Focus on form. Use your hips. Stay safe.
Then come back and tell me what happened.
Because at Martial Boss, we don’t just teach martial arts.
We help you live them.
Now go train hard, tap early, and respect the art.
Until next time—keep rolling, keep learning, and keep being Martial Bosses.